Links and posts about issues related to hearing loss ~ written and compiled by a Deaf audiologist with bilateral cochlear implants who is ASL-fluent and loves assistive technology
On June 21, 2021, Zoom released Version 5.7.0. In the update notes, I noticed the following and decided to investigate:
As a reminder, Live Transcript/live transcription (LT) is the ASR/auto-generated captioning powered by Otter and offered by Zoom. It is currently available on paid accounts and if you are Deaf or Hard of Hearing, you can also fill out a form referenced in the Zoom blog post below if you have a (free) Basic account and want access to the LT feature. It is integrated within the Zoom app itself.
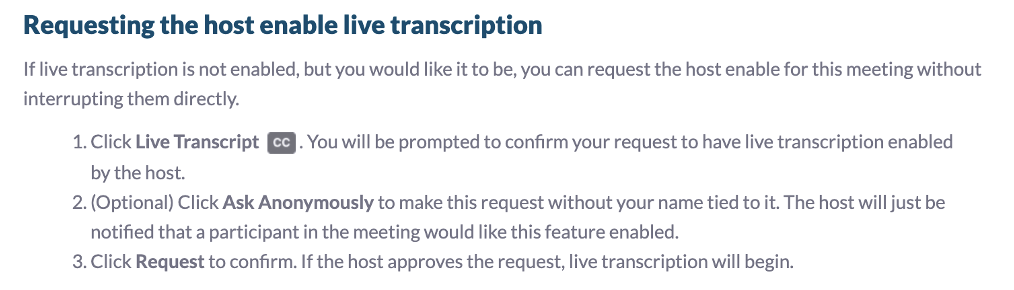
In this Zoom blog post which includes directions on how to enable the LT feature, Zoom seemed to allude to the possibility of participants/attendees being able to control enabling LT in upcoming versions. This is one of the biggest complaints about Zoom accessibility – the fact that we are at the complete mercy of the Host when it comes to turning on LT during a meeting or webinar. Google Meet and its on-demand closed captioning option, whether you are a host or participant, gets this absolutely right.
The Good:
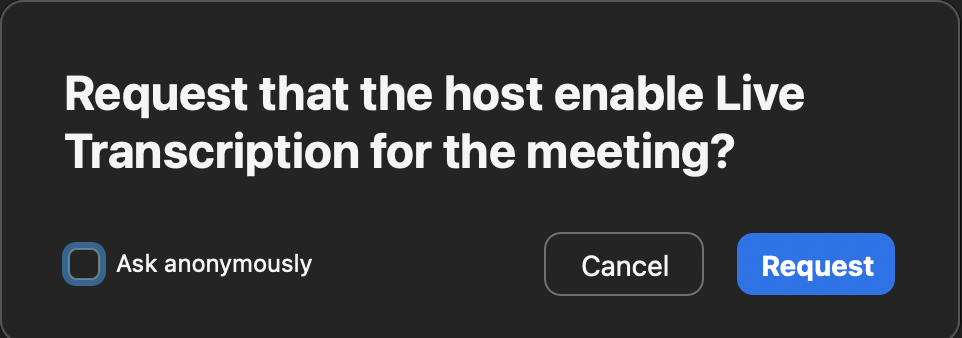
Participants and attendees now have the ability to discreetly request that the LT feature during a meeting or webinar, without interrupting the entire event
Participants and attendees can even do this anonymously
This is available to Windows and Mac computer users and iOS (iPhone/iPad) users
Portal allows for LT to be turned on automatically and for Full Transcript to be displayed to the side
The Bad:
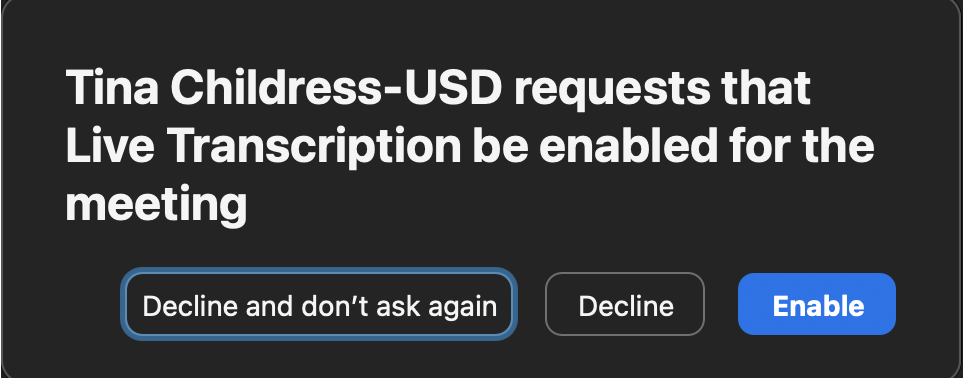
The Host can choose to turn this Request feature off so it’s not even an option
The Host can decline (?!?!?) to turn on LT after it has been requested
This is not yet available on Android OS
Chrome OS/Chromebooks (which is popular in schools) are still woefully behind in terms of having access to LT. Not only is it very, very delayed but this feature isn’t even offered yet for Chromebooks.
The Host can choose for Participants and Attendees to not see the Full Transcript on the side
(ADDED) In order for this feature of being able to Request LT to happen:
The Host has to have Version 5.7.0
The Host has to have already gone into their User Portal and turned on the Live Transcription feature referenced below under Closed Captioning
Personally, I feel like this is a half-hearted attempt to provide individuals who are Deaf/Hard of Hearing with the control they need to turn on the ASR-generated LT feature. It still allows the Host to DECLINE that this feature be turned on. I really, really hope that the version of Zoom that was discussed in the Zoom blog will come to fruition and not only will paid and free accounts have access to Live Transcript, but that DHH individuals will have complete autonomy in accessing this LT feature and not have to rely on a Host to turn it on or worse, decline to turn it on.
Settings and views
The first thing you need to do is make sure you have the latest update to Zoom for this feature which is Version 5.7.0.
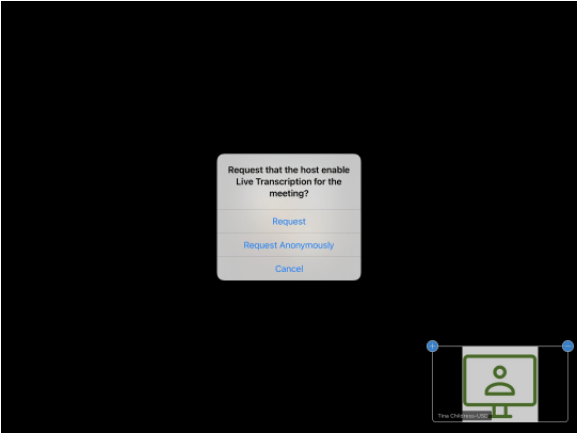
Second, as Host of a meeting or webinar, this is what you will see when you click on the Live Transcript/CC button (NOTE: The Host has the option to un/check the box – I am not a fan of this because this means that participants and attendees can’t make this request):
Here are the options in the Advanced Settings of the User Portal on Zoom – I like that you can turn on LT automatically but don’t like that Hosts can deny viewing of Full Transcript to the side:
Below are directions if you are doing this from a Windows or Mac computer:
Below are directions for iOS and Android OS phones and tablets. (NOTE: As of 06/25/21, Android OS still can’t update to 5.7.0)
As a participant on my Mac computer, I click on the Live Transcript/CC button on the bottom of my page and I will see this in the middle of my screen (Note: You can Ask anonymously):
As a Host from my computer, here is what I will see – not a fan that the Host can decline:
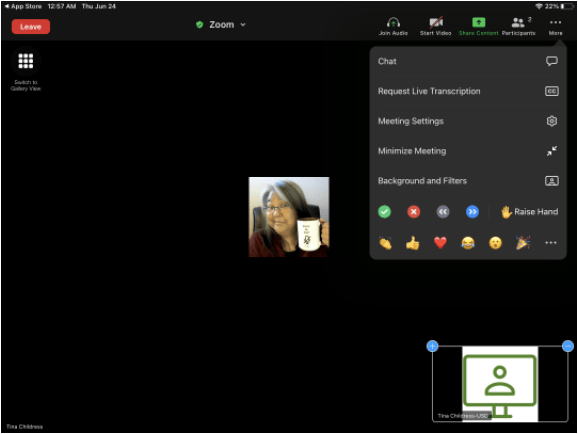
As a participant on my iPad, I click on the 3 dots (also known as the Meatball Menu) and I will see the option to Request Live Transcription:
After I click on “Request Live Transcription”, here is what I will see:
As a host on an iPad, here is what I see when someone makes a request (again – not cool that a Host can decline):
I still feel like Zoom has some headroom in terms of improving accessibility options…don’t EVEN get me started on lack of LT options or consistent 3rd party captioning in Breakout Rooms! We are also still waiting for the LT feature to be available to ALL, not just paid accounts.
As a person who is deaf/hard of hearing and uses bilateral cochlear implants to hear, communicating during the pandemic has been auditorily, mentally, psychologically and even physically challenging.
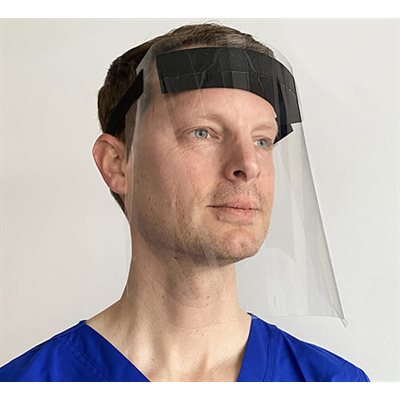
Auditorily, I struggle to hear people speaking behind masks which cut off any visual cues that might help me and physical distancing means that their voices will be softer. Masks with clear windows or even face shields can provide additional visual cues but at the expense of compromising the speech signal even more.
Mentally, the additional cognitive load that is required to make sense out of the bits and pieces of what I hear and don’t hear has me exhausted by the end of the day.
Psychologically, I get frustrated and angry and sad and feel all the feels, because communication is so hard but at the same time I crave (SAFE!) interactions with people outside of my home.
Physically, I struggle not to drop and break my cochlear implants which cost about the same as a decent used car, as I take my masks on and off and everything gets tangled in my hearing equipment, my glasses and my long and flowing COVID hair (which is the longest it has been in at least 30 years).
The other phenomena that I have been experiencing and apparently, many of my other deaf/hard of hearing friends have, too, is that I find myself leaving my cochlear implants OFF more and more hours per day compared to pre-pandemic times. I affectionately call this “deaf o’clock”. With everyone being home, extra sounds, the need to concentrate on tasks at my computer…it’s just easier to leave my ears off. A consequence of this, though, is that it means I am not stimulating my brain as much with auditory input which results in poorer speech comprehension ability (i.e., being able to understand what people are saying). Think of it as “not practicing your ability to hear and understand” because we are essentially sitting here in silence. It’s like trying to pick up French again if the last time you used it was in high school French class.
So, on the one hand, the pure physics of sound being compromised by masks and physical distancing preclude me from hearing my best through my cochlear implants. On the other hand, I’m not perhaps at my peak performance because I’m not practicing enough. The end result is the same…I struggle to hear and I’m exhausted.
I’ve decided to take all of these social media reminders and prompts for self-care to heart. Some of you may not agree with this tactic or don’t feel safe doing this but I feel my visual and observational super powers kick in when I do this…I just go out in public with my EARS OFF and put the communication burden on the other person.
You know what? Deaf people who don’t/can’t use hearing aids or cochlear implants and hear nothing have always done this and they’ve survived and thrived. Communicating with people behind masks is not that different for them.
I mainly do this when I go to the grocery store. Outside of home and work, this is basically where I go the most. It’s completely LIBERATING to put on a mask like every other person who doesn’t have to worry about things getting tangled or situating it just right between my eyeglasses’ earpieces and my cochlear implant processors. The silence as I enter into a store is a bonus. While cruising up and down the aisles to fill my cabinets and refrigerator, following the one way arrows and keeping at a distance does not require any hearing ability – it’s the check out that has always made me anxious. I see the mask moving so I know they’re saying something but I may have no idea because not only are they behind masks, they’re also often behind a plexiglass shield which further dampens sound.
I used to get really stressed and lean in to hear, sometimes people would pull down their mask and I would recoil and tell them to please put their mask back on (communicating with me is NOT more important than public health and safety) or I would go into full geek mode and pull out my smartphone and use a speech-to-text app where they would talk and their speech would be transcribed on my phone. That’s a heavy load!
What I realized is that now when I enter into the store in deaf-stealth mode and reach the checkout counter, I point to my ear and shake my head, make eye contact with the checker, we share a slight nod of understanding and voila! They get that I don’t hear. This is where the magic happens….THEY are constantly looking up and down and around, point at things like the ever-rising cost total (did I really need those Pop Tarts?), give me a thumbs up and thumbs down to confirm I understood their pantomime and you know what?? IT WORKS! They got their message across, I understood and I didn’t have to work as hard because they accommodated me rather than me having to work harder to come up with these accommodations where the burden is all on me. If something isn’t clear, they’ve even pulled out pen and paper to ask me a question.
I don’t do this for every situation, just ones where I feel that I can take a break and the communication is not that urgent and not worth the stress. I also do this when I’m out and about and alone – I wouldn’t do this if I have to communicate with my family, friends or co-workers.
So, if you see me out in public and call my name and I don’t answer – please don’t be offended. I’m not ignoring you. I just don’t hear you.
Disclaimer: when I used to travel by airplane, I would also go into deaf-stealth mode because the quiet is blissful and gate agents seemed to remember the deaf woman who doesn’t talk vs. the deaf woman who has clear speech and they’re more likely to accommodate me with any flight changes. But that’s a blog post for another day…
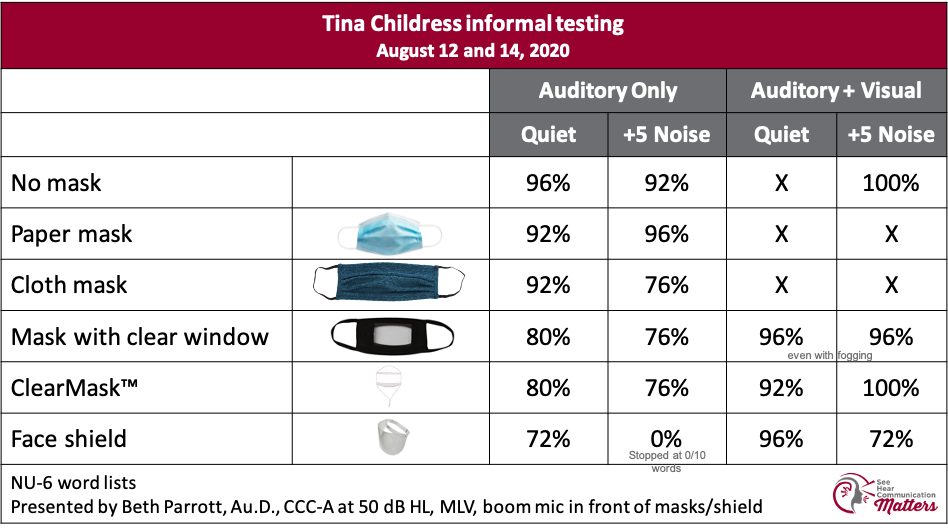
We got a new audiometer in my office so my co-worker, Beth, and I decided we would put it through the paces, learning how to find buttons to push, word lists to play and other features as we went along. We had discussed doing some INFORMAL testing (i.e., n = 1…me) with the various types of masks and shields we had available so I got in the booth on the patient side and Beth worked the audiometer.
The results below were taken on two separate days – some of you may have seen my Facebook post where I posted my Day 1 results. Day 1 word recognition (WR) testing was all done in quiet and we forgot to test the paper mask. After some specific requests, Day 2 incorporated the paper mask and we also did WR testing in noise.
Here is the (informal) testing protocol that we used:
NU-6 word list – one syllable consonant-vowel-consonant words, open-ended list
Presentation level = 50 dB HL via Monitored Live Voice (MLV) with boom microphone positioned in front of masks and shield in the same position, simulating what a teacher might be doing
Testing done in quiet
Testing done in background noise condition – we used 4-talker babble and had a +5 signal-to-noise (S/N) ratio which meant that the speech signal (in our case, 50 dB) was 5 dB louder than our competing background noise (so it was set to 45 dB). These are the same conditions that I use when I test students.
Testing was done without and then with visual cues
Some background on me and my hearing history in case you didn’t know: I am a late-deafened adult who lost my hearing at age 29. I’ve now had my Advanced Bionics cochlear implants for 20 and 15 years, respectively, and I’m so grateful for this technology! I have always done very, very well with my cochlear implants as evidenced by my scores with “no mask” above. There are still times when I struggle and masking and distancing have definitely played more of a role in this. I’m so thankful that I am also fluent in ASL and tech savvy for those times when I need help!
These results only reflect MY abilities and it is more of an intra-subject analysis and personal account. That being said though, if I, as a high-functioning auditory communicator struggled as much as I did, what about our students who have been deaf/hard of hearing since birth or have had minimal benefit from their hearing aid or cochlear implant or don’t have a complete language or… ???
My interpretation of these results:
My cochlear implants benefit me tremendously for listening (auditory learner effect)
Even with 50-year old eyes and need for progressive lenses, they still benefit me for lipreading/speechreading cues (visual learner effect)
The “paper mask” had the least effect on causing me to have WR errors.
The full “cloth mask” didn’t really affect me until background noise was introduced
The “mask with clear window” and “ClearMask” had the same effect for me of causing more WR errors whether it was in quiet or in background noise and I was listening only
When I was able to lipread, my scores jumped back up near ceiling levels. I was shocked that I was even able to benefit from visual cues while lipreading Beth behind a fogged up “mask with clear window”!
Beth noticed subjectively that my responses appeared more confident and quicker when she was using the ClearMask – perhaps it was because I could see so much more of her mouth and there was less fogging. I should also note that people love or hate this mask – its design definitely is not universal.
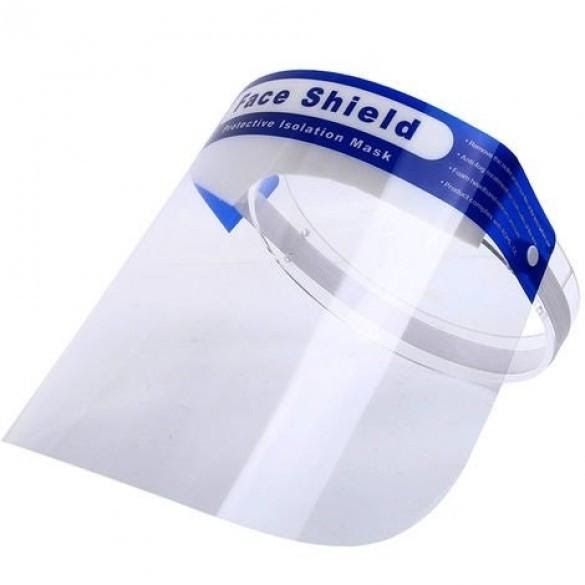
I really, really, really don’t do well with face shields if listening only! To be honest, this was disappointing to me because I have been a shield advocate because it seemed a good solution for people that need visual cues and can be more comfortable to wear (though not as protective against SARS-CoV-2 as masks). It may still be better for some people but definitely not me.
This was the most difficult condition for Beth to keep her voice at a steady loudness level. She noticed as soon as she put the shield on that her voice was echoing back and sounded different. She also looked at the VU meter on the audiometer (this is what we look at to make sure our voice isn’t too soft or too loud and is steady) and it was noticeably quieter by about 10 dB. She kept her voice at the same level as much as her muscle memory allowed and it was amazing how the shield really just decimated the energy of her voice. In essence, instead of her voice being +5 (i.e., her voice being 5 dB louder than the background noise), it was more like -10 dB (i.e., her voice being 10 dB quieter than the background noise). That’s significant for me to score ZERO PERCENT. Besides that, think about how hard talking behind a shield can be for a teacher!
Having been hearing for most of my life, I was shocked (and pleasantly surprised) that I did as well as I did basically with all lipreading with the shield in noise with visual cues.
The more rigid the plastic, the more of an effect it had on me – my scores auditory only were significantly worse compared to the “paper mask” and “cloth mask”. The shield had the most detrimental effect across the board.
Final thoughts:
There is no one perfect mask, face covering or shield that will accommodate all students (or adults)!!!
I know this may not be what you want to hear (I’m looking for the “holy grail” of masks and shields, too!) but I feel like we’re still on the hunt for something “better”.
You need to figure out if the student is a…
Auditory learner – I would recommend a “paper mask” or “cloth mask”
Visual learner – Some students will need a “mask with clear window”, “ClearMask” or “Face Shield” to access lipreading cues. Consult your educational audiologist to consider using a remote microphone system to overcome the effects of sounds being muffled. This is critical if you have a teacher using a face shield. Remind your student to keep in visual contact with the teacher as much as possible.
Based on the answer above, you should choose the appropriate mask, face covering or shield taking into account which kind of learner they are.
If you or your student have multiple slots on your personal amplification or implantable device, I highly suggest getting some kind of “mask program” where:
overall output is increased (to compensate for social distancing making all sounds quieter) and
frequencies above 1000 Hz and especially above 4000 Hz have increased gain due to the loss of these high frequencies being filtered by masks and shields
You’ll want to experiment with this with your audiologist since this is not an exact science yet and really, depends on if you are listening mostly to people with masks, face coverings or shields (those with a clear window will need more output and gain in the high frequencies).
There have been quite a few studies that have also looked at the acoustic effects of masks and shields – this is just my contribution with my own scores and thoughts.
Just this morning, Abram Bailey of Hearing Tracker alerted me to a new study done just down the road from me (!!) at the University of Illinois at Urbana-Champaign. They looked at how different kinds of masks, face coverings and shields impacted high frequency-speech sounds. The high frequencies contain the “energy” for consonant sounds and consonant sounds help you distinguish one word from another – if you can’t hear them, it sounds like everyone is mumbling. Check out how these different conditions are almost exactly reflected in my scores! (I did not do any testing with an N95 respirator nor a mask with cotton/spandex blend jersey)
If you’d like to see some more mask and shield studies, you can go to my social bookmarking page at https://raindrop.io/collection/2663069 and type #Masks in the Search Bar.
If you’d like to see some user comments and thoughts on different masks, face coverings and shields that they’ve used, check out this previous blog post where colleagues, Mary Beth Napoli, Carrie Spangler and I created some surveys to see if we could find a trend. SPOILER: we didn’t but the comments were still valuable!
I also had the privilege of collaborating with Catharine McNally on possible solutions involving assistive technology for situations like teleconferencing and using speech-to-text technology. Please check out our Knowledge Base at connect-hear.com!
I’d like to finish this post with a plea to anyone that has sewing skills and has experience making masks. This is my Wish List of features for a mask that I have yet to find:
USE OF QUILTING FABRIC – for protectiveness, coolness and breathability
MEDIUM THICKNESS VINYL WINDOW – to hold its shape and not get wrinkly, anti-glare and anti-fog would be bonuses but I know difficult to achieve
WINDOW SIZE – enough to see the whole mouth but not so much that it affects coolness and breathability
METAL NOSE PIECE – to prevent my glasses from fogging up and keep my nose covered, may have to be external if the mask is washable because it might be prone to rust out if sewn in
DARTED DESIGN (i.e., not flat) – so that the mask sits away from my face which makes it easier to breathe and so the window doesn’t get sucked onto my lips when I breathe or talk
RETENTION OPTIONS – ear loops don’t work for me but do for others, I prefer an adjustable head loop style with a toggle or something to make it bigger/smaller, if it was a little stretchy that would be great, too
AVAILABILITY IN ADULT AND KID SIZES
REPLACEABLE VINYL WINDOW – so I can throw the cloth portion in the laundry (this would be a total bonus but not absolutely necessary)
The CDC outlines how to protect yourself and others from developing COVID-19.
Wash your hands often
Avoid close contact
Cover your mouth and nose with a cloth face cover when around others
Cover coughs and sneezes
Clean and disinfect
Monitor your health
We will be focusing on the third bullet point – the use of cloth face coverings.
The purpose of this post is to serve as a central location for surveys that have been developed by Tina Childress, Carrie Spangler and Mary Beth Napoli.
Tina Childress is an educational audiologist in Illinois and is a bilateral cochlear implant user. Carrie is an educational audiologist in Ohio and uses a cochlear implant and a hearing aid. Mary Beth is a retired Teacher of the Deaf/Hard of Hearing in New York and uses bilateral cochlear implants. We understand first-hand the challenges that accompany trying to communicate when people are using some kind of face covering.
Studies have shown that various kinds of solid (cloth) masks can have the following effects:
Loss of visual cues
Speech is quieter
Consonant sounds are dampened
This is in addition to the effects of listening at a distance [6 feet/2 meters] and often, competing background noise. All of these factors have a compound affect on those of us already struggling to hear due to hearing loss.
As educational audiologists and educators, we are concerned, like many of our colleagues, about the effects of face coverings in a classroom setting. There have been discussions about alternative “coverings” in the form of face shields. Carrie has been a driving force on this issue and has written articles and been interviewed to discuss some of the advantages of face shields.
We wanted to make sure that we also got the opinions of many of YOU, people using masks with clear windows and face shields in non-medical settings, to see what improvements can be made or what you think is working well.
Surveys
In order to keep product comments separate, we decided to do separate surveys for each type of shield and mask.
Which face shield or mask with clear window do you use? Click on the corresponding link below to leave us your thoughts! You may answer more than once if you have multiple products.
If there are any products that you would like to add to this list, please contact me (tina [dot] childress [at] gmail.com).
As I write this post, I am on Day 9 of social distancing and our entire state was recently given a “stay at home” order due to the COVID-19 pandemic.
All around the world, I’m watching my colleagues who work with Deaf/Hard of Hearing (DHH) students scramble as they transition to composing lessons for e-learning. Finding captioned content can be difficult, so some are resorting to captioning the content they want to use on their own.
I also have D/HH peers who need resources for adding captions to content that they view or use so it’s accessible.
I wanted to share some resources that might help.
What’s the difference between subtitles and captions?
Subtitles only reflect the dialogue of what is spoken on the screen. Subtitles can be in a variety of languages.
Captions not only reflect the subtitles but any non-spoken information such as environmental sounds like [door creaking] or [music] or [silence].
There are Open Captions (OC) which are always visible on the video content – you can’t turn them off. There are videos that you can watch on a portable device that are OC – you just play the movie and the captioning is there. If you go to a movie theater to watch an OC movie, you can’t turn it off (though the movie theater employee can).
There are Closed Captions (CC) which can be turned on/off by the viewer. There is a CC button on newer remote controls for TVs as well as cable/satellite boxes. Sometimes the control is on screen. When you watch DVD or Blu-Ray media, you might see a choice for “Subtitles – English” or “SDHH (Subtitles for the Deaf/Hard of Hearing)”. The first represents true subtitles while the second actually would be considered captions because they include the non-spoken information.
Why caption your videos?
For people that are DHH, captioning = access. The audio signal that comes from recorded or live content played through speakers is not as robust as what we might get talking to someone face-to-face. Also visual and speechreading cues are not always available. We rely on captioning to understand what we can’t hear.
People with normal hearing like captioning, too! Some people might like to watch videos on mute because they don’t want to bother others (did you know that 85% of Facebook videos are watched without sound?!?), maybe they’re multitasking, perhaps they’re trying to hear a video but it’s in a noisy environment, or maybe they’re still learning English.
There are many advantages to watching captioned content. Studies have shown that captioning can improve literacy in children – if you’re going to sit them in front of a screen, may as well turn on the captions! As a business, captioning your videos can increase the amount of time someone stays on your website/social media site, remembers your content as well as improve your SEO.
How can I caption videos?
These are just a few of the resources out there that you can use to add captions to your videos. I picked the ones that seemed to be the most used in the DHH/teaching community. I’m sure that every day, more and more are becoming available. I leave it to you to go to the websites and/or find video tutorials to make them work. If I find some great resources, I’ll add them.
Let’s start with some of the FREE websites (click on the name of the products to go directly to their website and directions for generating captions):
With YouTube, you’ll upload your video first. If you already have a transcript, you can sync it with the video. If you don’t have a transcript, you can enable automatic captions (unedited) or run your video through automatic captions and then edit them.
Here are directions on how to enable the auto-generated captioning which can be wildly variable in terms of accuracy, depending on the quality of the signal.
Comments:
If your video is more than 15 minutes, you will need to verify your account
“Amara’s award-winning technology enables you to caption and subtitle any video for free. For larger subtitling projects the platform makes it easy to manage teams of translators. And you can always purchase high-quality captions or translations from our passionate team of professional linguists.”
“Subtitles created in Amara Public are freely available to anyone. Use the award-winning Amara subtitle editor for free in a public workspace. Anyone with an Amara account can join the workspace and contribute subtitles in any language.
Amara Public is designed for crowd-based, open subtitle creation
Subtitles are always visible, editable and downloadable
Upgrade to Amara Plus to create subtitle files in a private workspace”
Comments:
You will be manually typing out the subtitles, they are not generated by automated captions. This should work well for shorter videos or videos that do not have a lot of talking.
“As a video owner or producer, you can upload and publish a video and hide captions, subtitles, and transcripts. By hiding this textual content, you can take the time you need to privately review and edit each file separately in the transcript editor.
Also, you can download the caption file (VTT file) and edit it using a text editor of your choice before re-uploading the edited caption file to Stream.
When you are ready, you can share the edited content with viewers by making it visible. By making captions, subtitles, and transcripts visible, your media content is more inclusive to viewers of all abilities.”
Comments:
If you don’t have a script, start with the ASR captioning and then go back and make the edits you need
“Zubtitle is an online tool that automatically adds subtitles to any video by transcribing the audio and generating subtitle text. Zubtitle offers multiple subtitle text style and makes it easy to edit subtitle text on the fly.”
Comments:
“Free” hooked me. You can caption ONE (1) video for free, otherwise, it’s 10 videos for $19/month or 30 videos for $49/month.
I found the caption editor for this site to be the most intuitive compared to the other free websites.
The website did a pretty good job of extracting the audio information from the video first and then transcribing it, getting it ready to be edited. There were not that many errors that I had to correct.
There are quite a few caption styles to choose from.
Here is a list of some companies that will create subtitles/captions/transcripts for you, with a quick turnaround time (anywhere from 24 to 72+ hours), but have an associated COST:
Anyone with a Gmail address will have access to Google Hangouts
If your email address has the same suffix (e.g., firstnamelastname@sameschool.org), you will have access to live captions through Google Hangouts
If your email address suffixes are different, there will be no live captions
You need to have a G-Suite account into order to start a meeting with Google Hangouts Meet – you don’t have to have G-Suite if you’re invited to a Google Hangouts Meet meeting
All Google Hangouts Meet meetings have access to live captions
(thanks to Mary Beth Napoli for the information above)
Click on the CC button to generate automated captions for all videoconference participants
If you record this call, the captions will NOT be saved to the recording
If you want to save the captions, you have to do a screenrecording
This popular videocall platform now provides automated captioned during the phone/videocalls
For individuals that are D/HH, having captions is great in addition to having visual cues from the videocall
Workarounds
(Again, h/t MBN for her insight on this!)
Run a speech-to-text (STT) app like Live Transcribe (Android only) or Otter or Ava (both are iOS and Android) on a separate mobile device such as a cellphone or tablet. You can also open up http://webcaptioner.com, Otter or Ava (only at the higher paid tiers) in another browser window. Make sure your computer speakers are turned up so the mobile device can pick up the signal. You will then be able to read captions on the mobile device.
Another way to use these STT apps is to hold your device under your chin and facing the camera so people can not only see your face for lipreading cues, they can read the captions. Be aware of computer glare on. your mobile device though!
If there is someone in your group that is able to get captions on their end, have them share their screen so that everyone can see the captions.
If you have access to three devices:
Device #1 – participate in the meeting
Device #2 – use the STT app to caption the audio signal coming from your speakers
Device #3 – zoom in on the captions to join the meeting as a separate “participant”
What if I want a recording of the captions from the class but they don’t transfer over when I record from within that particular videoconferencing platform?
In this situation, it would be best to do a screenrecording of your lecture. Here are some of the most popular ones:
Automated or manually uploaded captions only available on upper two tiers
Final Tips:
If you’re going to creating your own captions from scratch or editing a video more than about 15 minutes, PLAN FOR WORKING ON THIS FOR A FEW HOURS, even more so if you’re not familiar with the app.
Make sure to save early and save often. I learned that the hard way. 😦
Personally, for the amount of time I spent adding captions to a 15 minute video, it would have been worth $18.75 ($1.25×15 minutes) to have someone else do it. But you have to plan ahead unless you want to pay a higher price for quick turnaround time.
This can be a good task for a paraprofessional in the classroom.
A fantastic resource for not only open captioned but also audio described (for the visually impaired) content is the Described and Captioned Media Program. They have THOUSANDS of titles on a variety of topics. This is a FREE service and the videos can be streamed right to your computer. Be sure check them out!
Resources
3PlayMedia has some great How-to Guides across different platforms and products
How to add captions using Google Drive, YouTube Editor, Pinnacle Studio, CaptionMaker and Aegisub
If there are any apps that I missed or if you have any comments, please let me know!
(Many thanks to Catharine McNally and Sarah Kiefer for their contributions, feedback, editing and comments on this blog post!)
In an effort to stop the exponential growth of COVID-19, we’re seeing daily announcements about schools and higher-ed institutions deciding to close or move coursework to an online format. For students who are Deaf/Hard of Hearing, it is important that educators and IT staff plan for accessibility if the online classes require listening to audio in order to participate.
We are seeing similar measures from companies and businesses putting travel bans into place and requiring employees to telecommute. Flights and larger events are being canceled and workers are being asked to stay and work from home.
This resource, created by Sarah Kiefer, from the Center for Deaf and Hard of Hearing Education has FANTASTIC information and guidelines on how to provide accommodations and accessibility to your students.
The remainder of this blog post will mostly pertain to high school, college/university and work settings.
“Accessibility Strategies for Deaf / Hard of Hearing People in Remote Meetings”
Be sure to head over to Medium and check out Catharine McNally’s fantastic article with a slightly different angle. Yay for teamwork!
Resources from the Deaf/Hard of Hearing Technology Rehabilitation Engineering Research Center
(content added 05/15/20) Christian Vogler at DHH-RERC has been doing some amazing work documenting best practices and use case scenarios with videoconferencing, especially Zoom. He has create two documents that are must-reads that should be used in planning an accessible online event. First is the more general document called, “Webinar Accessibility for Deaf and Hard of Hearing People” and the second document, “Accessibility Tips for a Better Zoom/Virtual Meeting Experience” looks at three case scenarios and what worked and didn’t work.
Communication Access Realtime Translation (CART) Services
Best case scenario, captioning is provided by a professional “live captioner” who can, with high-accuracy, caption synchronously with the speaker. CART allows for “live captioning” of audio events with the CART provider as the aforementioned “live captioner.” If you desire CART services as an accommodation, contact your employer or institution so they may start the process of securing one for you.
Live captioners can be either on-site or they can provide captioning remotely (or off-site). In the latter situation, the talker would need to wear a remote microphone (often Bluetooth) that connects to a computer to provide an audiofeed to the live captioner off-site via the internet. The captioned content would then be transmitted back to the student on their display device.
The advantages of having a live captioner:
If the audio signal is poor, they can fill in the gaps with contextual, visual and situational cues
They will be aware of names, proper nouns and technical vocabulary if materials are provided to them ahead of time
They can look at visual materials (e.g., presentation slides, handouts, programs) for support
They can ask for clarification if someone is soft-spoken, not talking into the microphone or multiple people are talking simultaneously
They often arrive early to ensure adequate connections to projectors, the internet, etc. as they set up their equipment and can let others know if there are connection problems
Automated Captions
If CART is not an available option, then “automated captions” can provide some assistance. Automated captions have improved greatly in the past few years in terms of accuracy, speed and integration with other programs and apps. They will continue to improve with increased time and exposure to more words; however, they do not have the same level of accuracy that a live captioner can provide. There are some programs/apps that have decent speed (i.e., insignificant delay) but they are not as accurate as a live captioner.
The quality of the automated captioning is HEAVILY dependent on the audibility and quality of the sound (the input) and can be affected by:
Rate of speech
Accents
Background noise
Distance from the talker to the microphone
The “success criteria” for optimal auto-captioning input includes:
Each speaker has their own microphone
One speaker speaks at a time
Background noise is minimized (be at home vs. a coffeehouse!)
The next step is determining which platform is available and compatible with the captioning features needed by students and employees.
(EDIT: 05/15/20) The information below has been updated!
A few weeks ago, Catharine McNally launched a Knowledge Base at Connect-Hear.org…
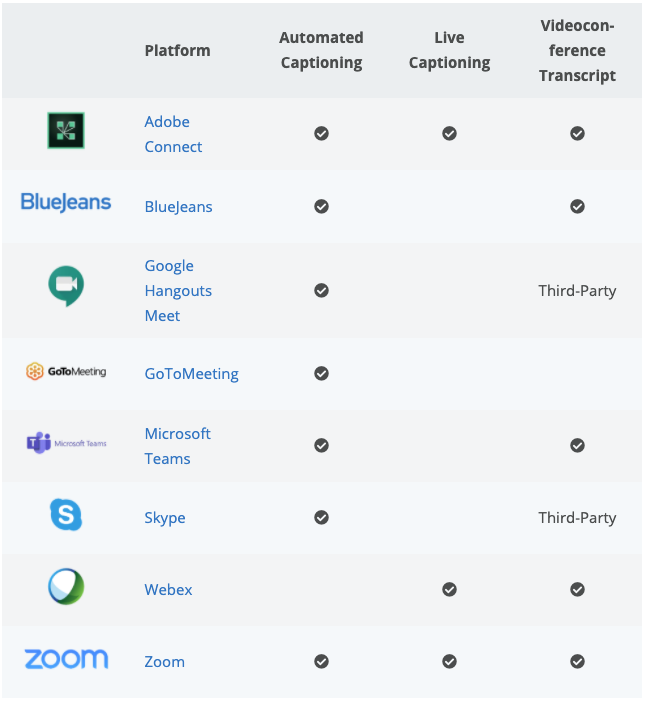
The information on this Knowledge Base will be kept current so I refer you to Connect-Hear.com. Here’s an overview of the videoconference platforms that we’ve covered:
ANY platform can use the services of a live captioner via a 3rd party captioning service. Captions are then displayed in a separate browser window. Individuals can either resize the captioning window compared to the videoconferencing window or they can view the captions on a separate device or monitor.
Designated teleconference captioning by dialing into a phone number
Specific states have a contract with Sprint to provide conference captioning when the audio input is via a phone number. You can request captioning via Sprint Teleconference Captioning (STC) if are in AZ, CO, CT, FL, HI, ME, MO, NJ, NC, RI, SD, VT, WV or WY. In addition, federal employees can also access teleconference captioning via Relay Conference Captioning.
Using captioned phone services
If there is an option for an individual with normal hearing to dial into a phone number (e.g., to find out that day’s homework assignment, participate in a conference call), there needs to be an accessible option for your student/employee who is Deaf/Hard of Hearing. This can be accomplished through the Telecommunications Relay Service (TRS) which is a free captioned phone service available in the U.S. This is NOT the same as having your videoconference / webinar / instructional lesson captioned by a live captioner.
CapTel, CaptionCall and ClearCaptions have stand-alone captioned telephones that sit on your desk. Products such as WebCapTelalso have apps that can be viewed on portable devices as well as your computer.InnoCaption can be used to caption calls on a cellphone.
Note:
These captioning services are not permitted if you’re communicating with someone in the same room – only if you’re dialing in from a different location.
The captioning text may look different if you’re used to seeing captions normally provided for a conference as opposed to a telephone call.
Speech-to-Text Apps
There are also speech-to-text (STT) apps that use automated captions and may be used for access in one-on-one conversations or small groups in case of necessity. Some are free and some have a cost.
The same limitations noted for the effectiveness of automated captions used with videoconferencing applications would also apply to these STT apps. In addition, STT apps pull language from the most commonly searched words on the internet, so in some cases, STT apps will insert an inappropriate word leaving the individual who is Deaf/Hard of Hearing unsure of the conveyed content.
This technology should be considered as a backup when the provided captions stop working as it would not be an adequate source of access in most situations.
I’ve created a separate resource (http://bit.ly/SpeechToTextOptions) discussing the different STT apps and features. You can use an STT app on your phone or tablet, turn up your speakers so that captions can be generated, separate from the device where you’re viewing your audio/video content. The resource above also has directions on how to connect with a remote microphone to improve audio input so that the captions are more accurate..
Learning Management Systems (LMS)
Another tool used by educators is an LMS platform. Here you can create assignments, grade assignments, take attendance, collaborate, share content and a variety of other functions. Below are some of the most popular platforms and resources for making the audio content accessible.
This information was generated by 3PlayMedia, a provider of live and post-production captions. It discusses how to add captions or integrate captions across a variety of media.
This spreadsheet lists a variety of post-secondary institutions and their Remote Teaching Resources.
This resource and this informational page from the National Deaf Center on Postsecondary Outcomes has fantastic information for educators as they transition to online teaching.
DeafTEC, part of National Technical Institute for the Deaf, has useful tips in designing your curriculum so that it’s accessible.
Final Thoughts
This is a unique time. We are all being affected both directly and indirectly by schools, institutions and businesses switching to an online format. Resources will be taxed, including the bandwidth of internet connections as more and more people will be going online. There are also families/individuals that do not have access to technology or internet connections that many of us take for granted. For individuals who are Deaf/Hard of Hearing, we need to be intentional and mindful and prepared for providing them with equal access.
In the dead heat of summer, my friend casually mentioned on a fb chat that she and her family were going to be celebrating New Year’s Eve on a cruise ship. I was intrigued and then elated when I saw the “…” (indicating active typing) on our chat followed by “The invitation is there if y’all can go.” A quick check with hubby and we (somewhat impulsively) decided that we would join them!
I hadn’t been on a cruise since I was 16 and my family had never gone so this would be an entirely new experience for us. On the other hand, my friend, Lisa, had been on several cruises with different members of her family and was well-versed on the ins and outs of cruise life. Lisa and I are both late-deafened – I am ASL-fluent and she knows a handful of signs. We are both excellent spoken language communicators and rely on visual information and lipreading in difficult listening situations. This meant that in terms of accommodations to access any audible information such as public announcements or hear (and UNDERSTAND!) people on stage for a show, real-time captioning would be needed so it was accessible to both of us.
I have been deaf for about 20 years now but when I started my career in audiology, I had normal hearing. The Americans with Disabilities Act (ADA) will be celebrating its 30th anniversary this year.
“First introduced in the 100th Congress, the ADA bans discrimination on the basis of disability in the areas of employment, public accommodation, public services, transportation and telecommunications. President George H.W. Bush signed the ADA into law on July 26, 1990.” [ref.]
As a former hearing person who now benefits from the ADA for accommodations, I am (unfortunately) not surprised at how often I have to remind the-powers-that-be what my rights are. Most of the time, it’s a matter of educating them about these rights and providing them with resources. They don’t know what they don’t know. There have been other times where they just flat out seemed to want to refuse on principle. In these situations, I tend to roll up my sleeves, dig in my heels and go into advocate mode. Getting captioning for this cruise was no exception – it was time to “advacate” (see definition above).
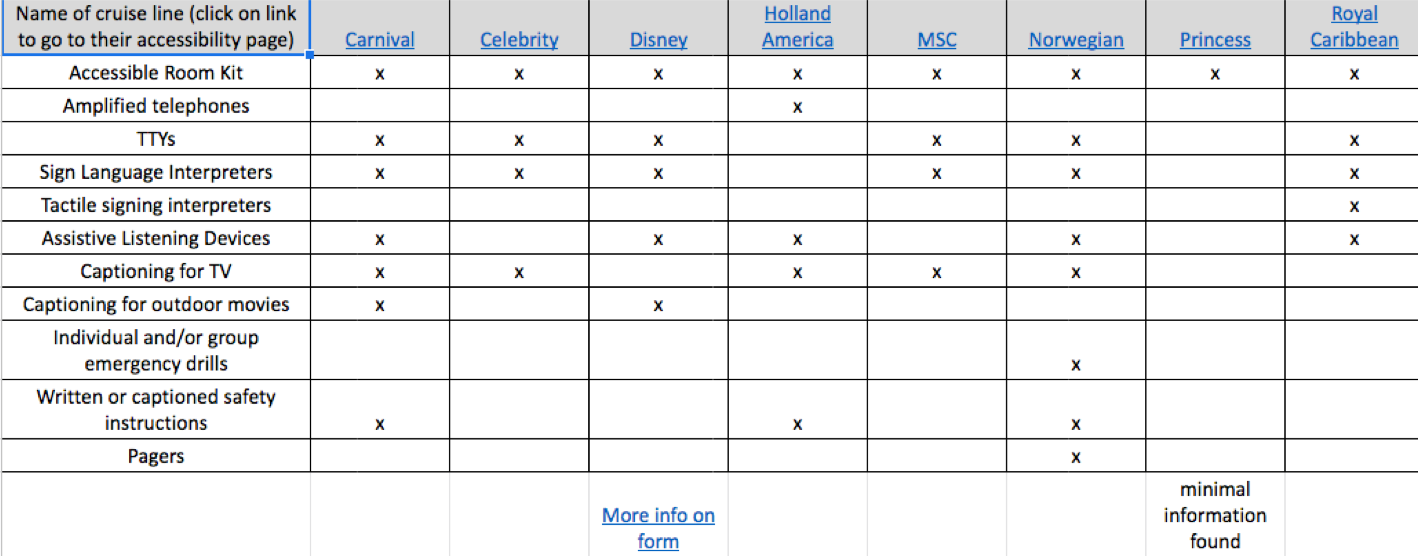
When you register for a cruise, there are sections where you indicate if you have a disability and what your needs are. I just went down the rabbit hole to find the disability services pages for the major cruise lines and it was fascinating to see what they offer/don’t offer.
I couldn’t figure out how to easily add a table to this post but you can see a larger and clickable version of the above table at http://bit.ly/CruiseLineAccessibilityDHH. Some of the information was really hard to find or not even listed on the website itself but rather on a form that you have to fill out. Click on the name of the cruise line in the table to go straight to their disability services page.
Here are the important points that you need to know:
Cruise ships, whether they are American or foreign, that cruise in U.S. waters are subject to the ADA. [ref.]
These accommodations are provided to you AT NO COST so be sure no one is trying to charge you extra or insist that you bring your own accommodations on board. This includes paying travel, lodging and incidentals for interpreters and captioners. [ref.]
Even if they don’t list them on their accessibility pages, you CAN request accommodations that provide you with EFFECTIVE communication (e.g., real-time captioning, ASL interpreter, tactile interpreter, assistive listening device, written scripts, preferential seating for access to visual cues, etc.) . [ref.]
This last point is the reason that I wrote this blog post. NONE of the cruise line accessibility websites mentioned real-time captioning as an accommodation on the ship. *If* they offered any kind of communication accommodation, it was ASL interpreters and/or assistive listening devices – these were the two options offered repeatedly (!) to us. Yet, for multitudes of deaf, late-deafened and hard of hearing individuals, real-time captioning might be the preferred accommodation for events like stage shows, musical numbers, trivia games, etc. because:
they don’t know sign language (e.g., my friend)
assistive listening devices can be ineffective if:
the microphone is not properly used (if the person is even using a mic!)
in large, reverberant and highly noisy areas
if the individual does not have good aided speech perception/word recognition skills (it’s like turning up the volume on a radio station that’s not in tune – it doesn’t help)
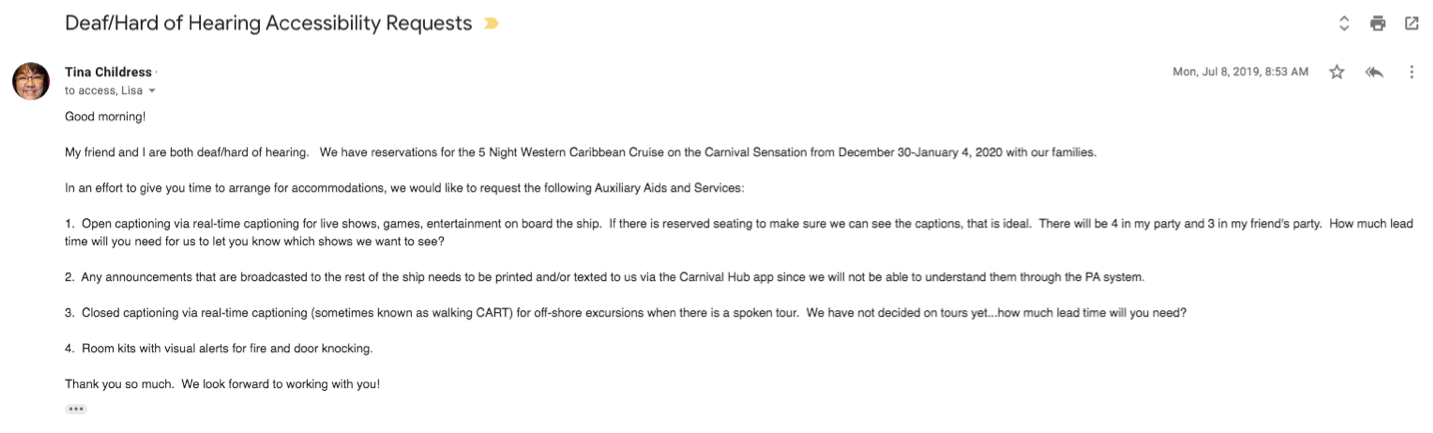
Here is my initial email to them:
One of the most important things I’ve learned about arranging for accommodations is be very specific about the accommodations that you are requesting. They don’t know that I’m late-deafened and that I prefer captions for some things and interpreters for other things. They don’t know that you might not know sign language (many assume that if we put down “deaf” or “hard of hearing” that we sign). They don’t know that you need preferential seating so that you can speechread. They don’t know that you don’t benefit from assistive listening devices. They can’t read our minds so we have to let them know what works best for us.
Don’t wait until last minute to request accommodations. If there are hiccups or cancellations, then hopefully you’ll have enough time to go to Plan B. I’m somewhat of a hyper-planner (!!) so I started this process 5 months ahead of time. Some of the websites ask for 60 days’ notice – I would probably start trying to plan around 3 months ahead of time.
Another thing I’ve learned is document, document and document. Save all emails, correspondence, etc. so you have a paper trail in case there are any disagreements or misunderstandings.
Have a designated point-of-contact on the boat in case there are problems. In our case, it was our captioner who had a direct line (a la “Batphone”) with the cruise staff. We had a great relationship with our captioner so felt comfortable asking her to contact them if there were concerns.
Lastly, know your rights. In the table above, there are some links to some case law as well as how cruises are covered under the ADA. Be prepared to drop some of those links in your emails to let them know that you know you are entitled to effective communication.
“…cruise lines are prohibited from discriminating against passengers on the basis of their disability by “fail[ing] to take such steps as may be necessary to ensure that no individual with a disability is excluded, denied services, segregated or otherwise treated differently than other individuals because of the absence of auxiliary aids and services.” [ref.]
After going back and forth in emails, they ultimately agreed to provide real-time captioning after trying to force us to use ASL interpreters or Assistive Listening Devices. I can’t help but wonder if it’s because I cited the judgment against them [ref.]. I don’t know if it’s because the person I was corresponding didn’t know themselves or if they really just didn’t want to offer captioning as an option. I had spoken to several deaf/hard of hearing friends prior to this cruise and I *knew* that captioning was possible. We just needed to be persistent.
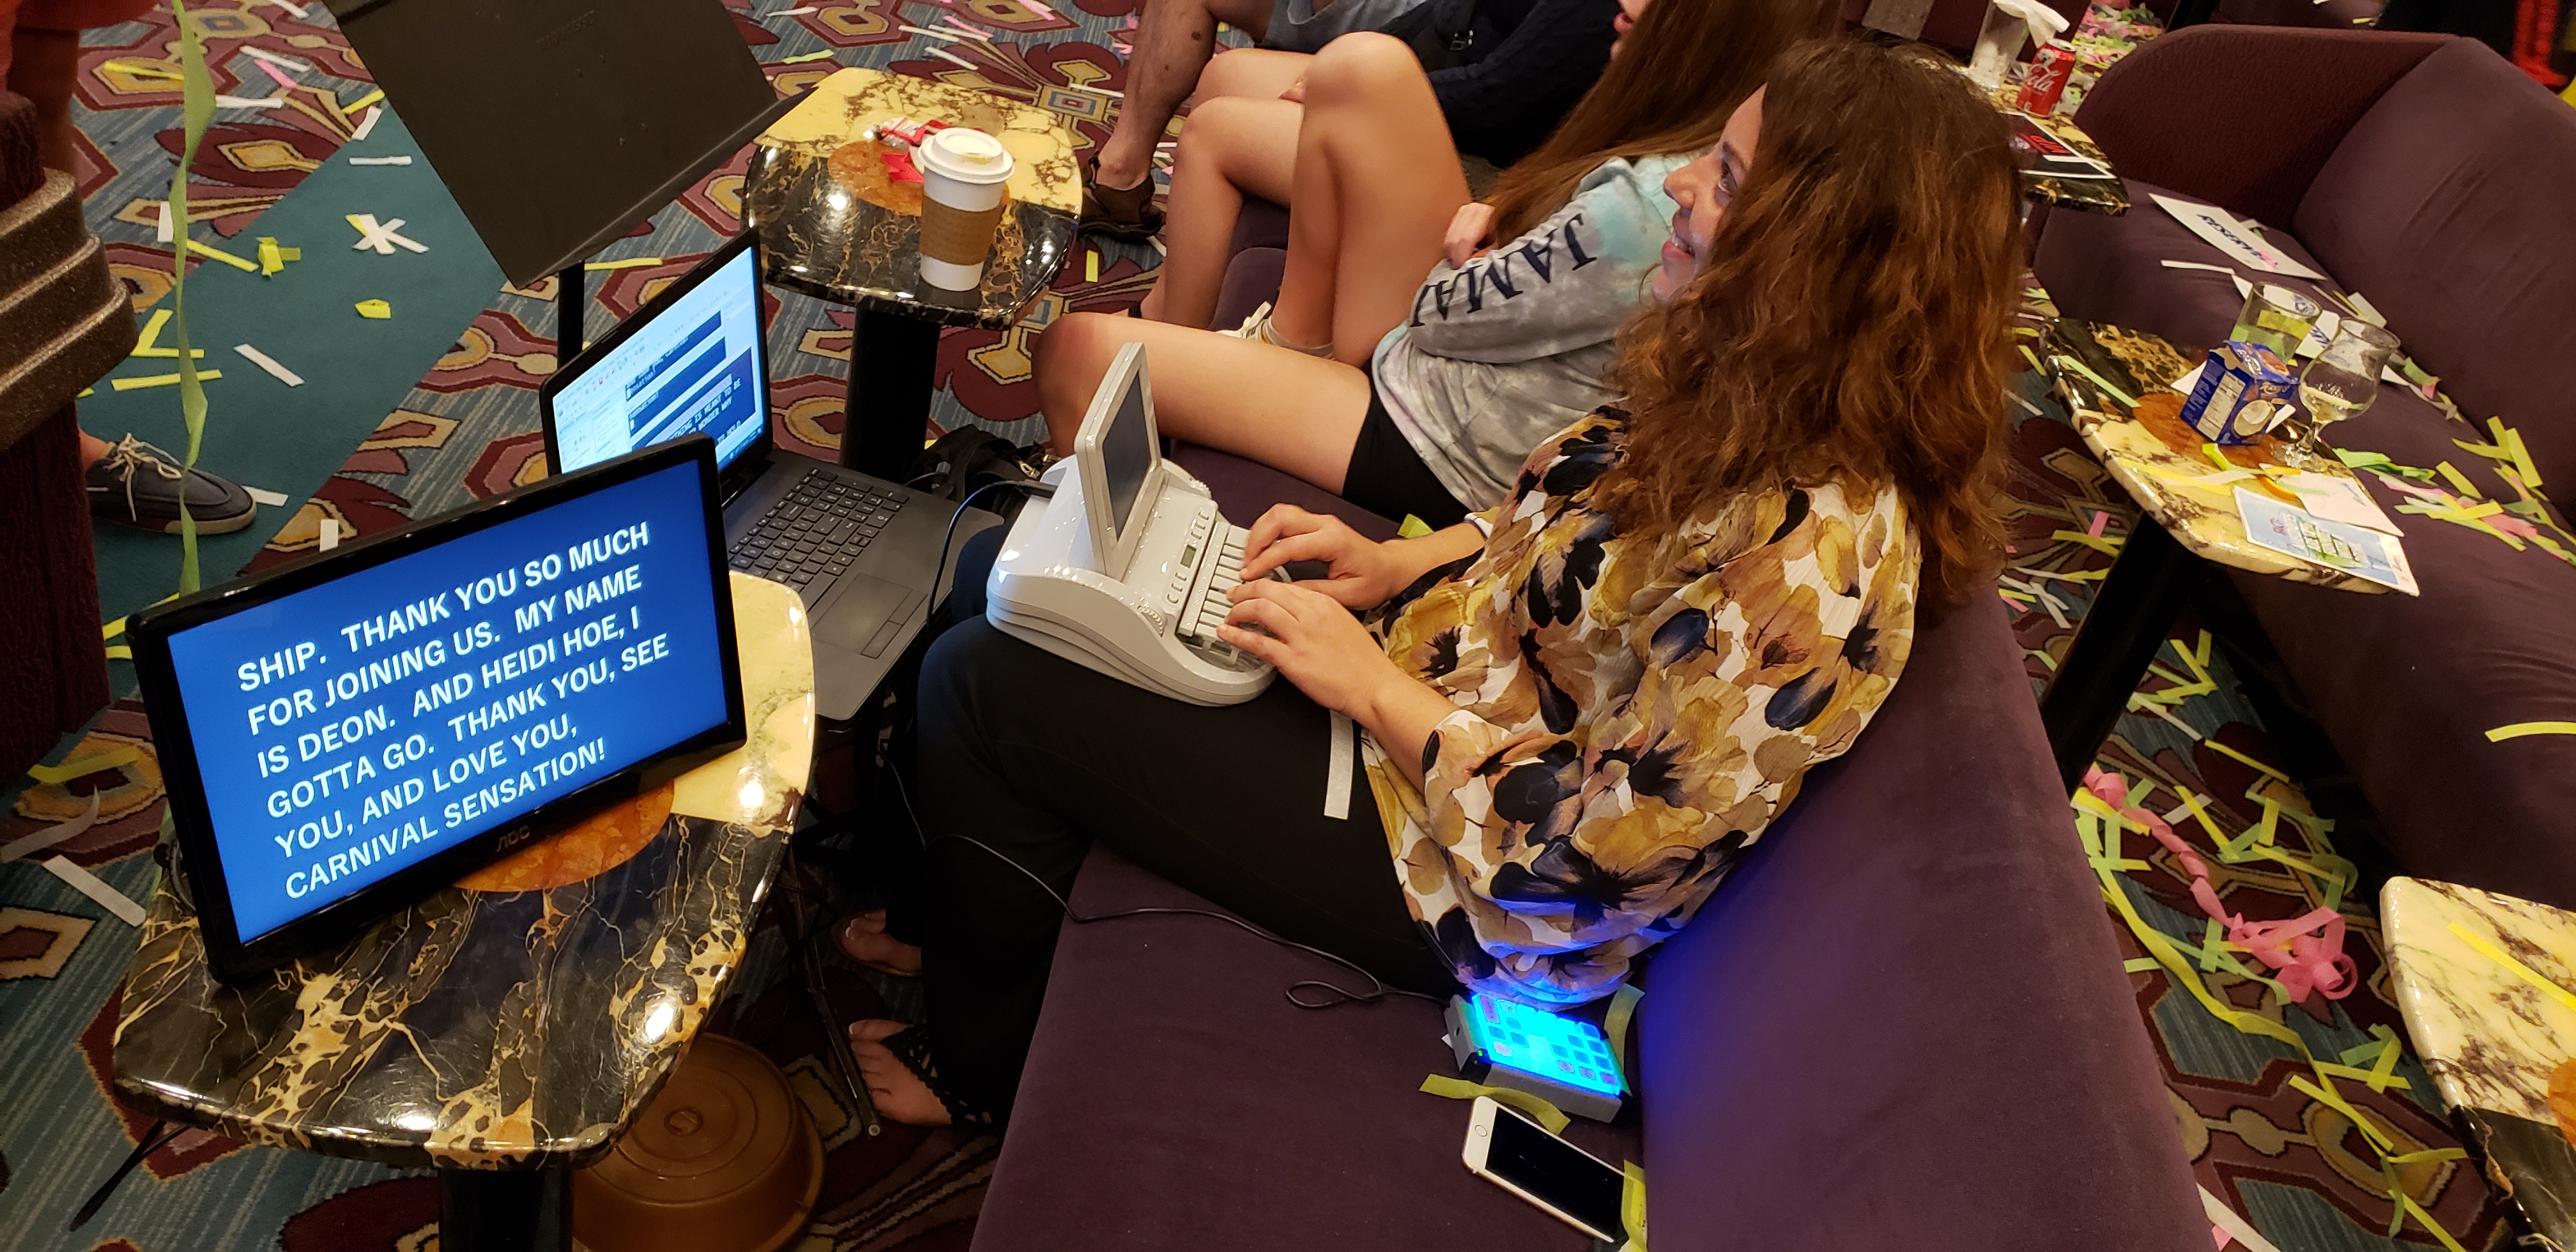
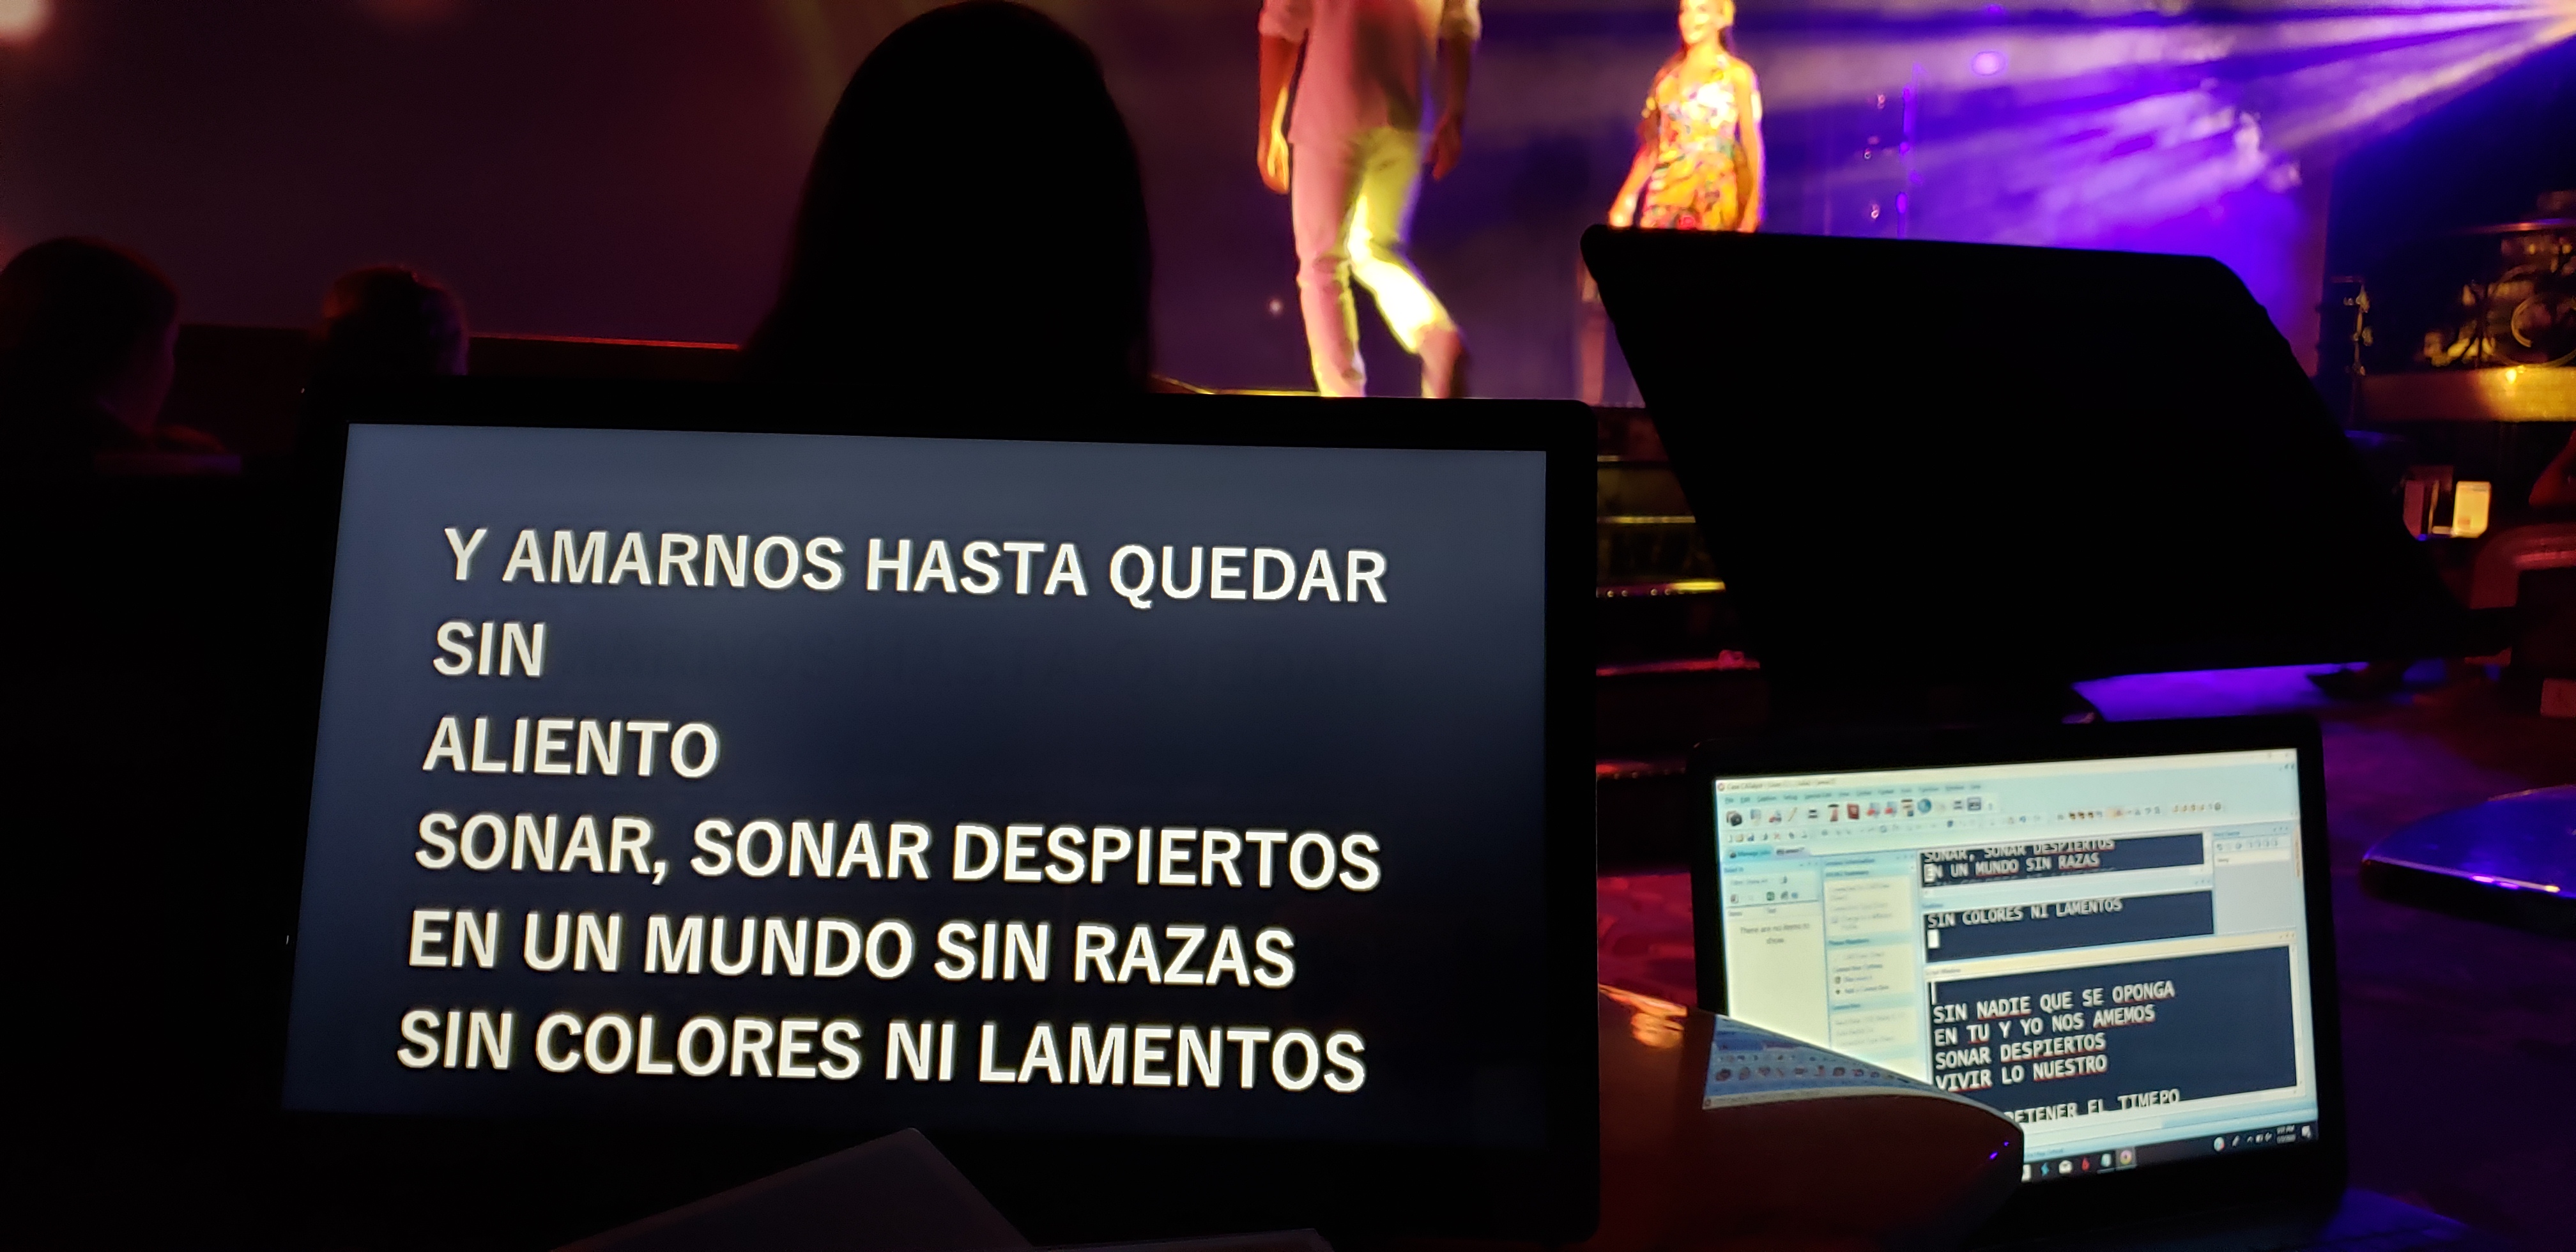
Our real-time captioner, Julia, was WONDERFUL. She had been a captioner on almost twenty cruises prior to this one and she was assigned to me and Lisa. Luckily, Lisa and I wanted to go to the same events otherwise it could have gotten complicated.
When you arrange for an ASL interpreter or a real-time captioner, I highly recommend asking that the person be assigned to you or your group alone or that you know how many other deaf/hard of hearing people might be vying for their time. This way you know what to expect. The advantages of having an assigned person is that I can communicate directly with them and let them know on the fly where I want to go or that I’m pooped and I just want to take the afternoon off, ears off. This is what hearing people get to do (decide last minute) so that should also be an option for us. We tended to use her services in the evening for shows and performances but we had the option to use her for events in the afternoon as well. We lucked out in that we were the only deaf/hard of hearing individuals on the ship. The captioner said that she had been in a situation where she was the only captioner and there were multiple groups that had to agree which events she would caption. Next time, I will definitely follow my own advice about requesting someone be assigned to me.
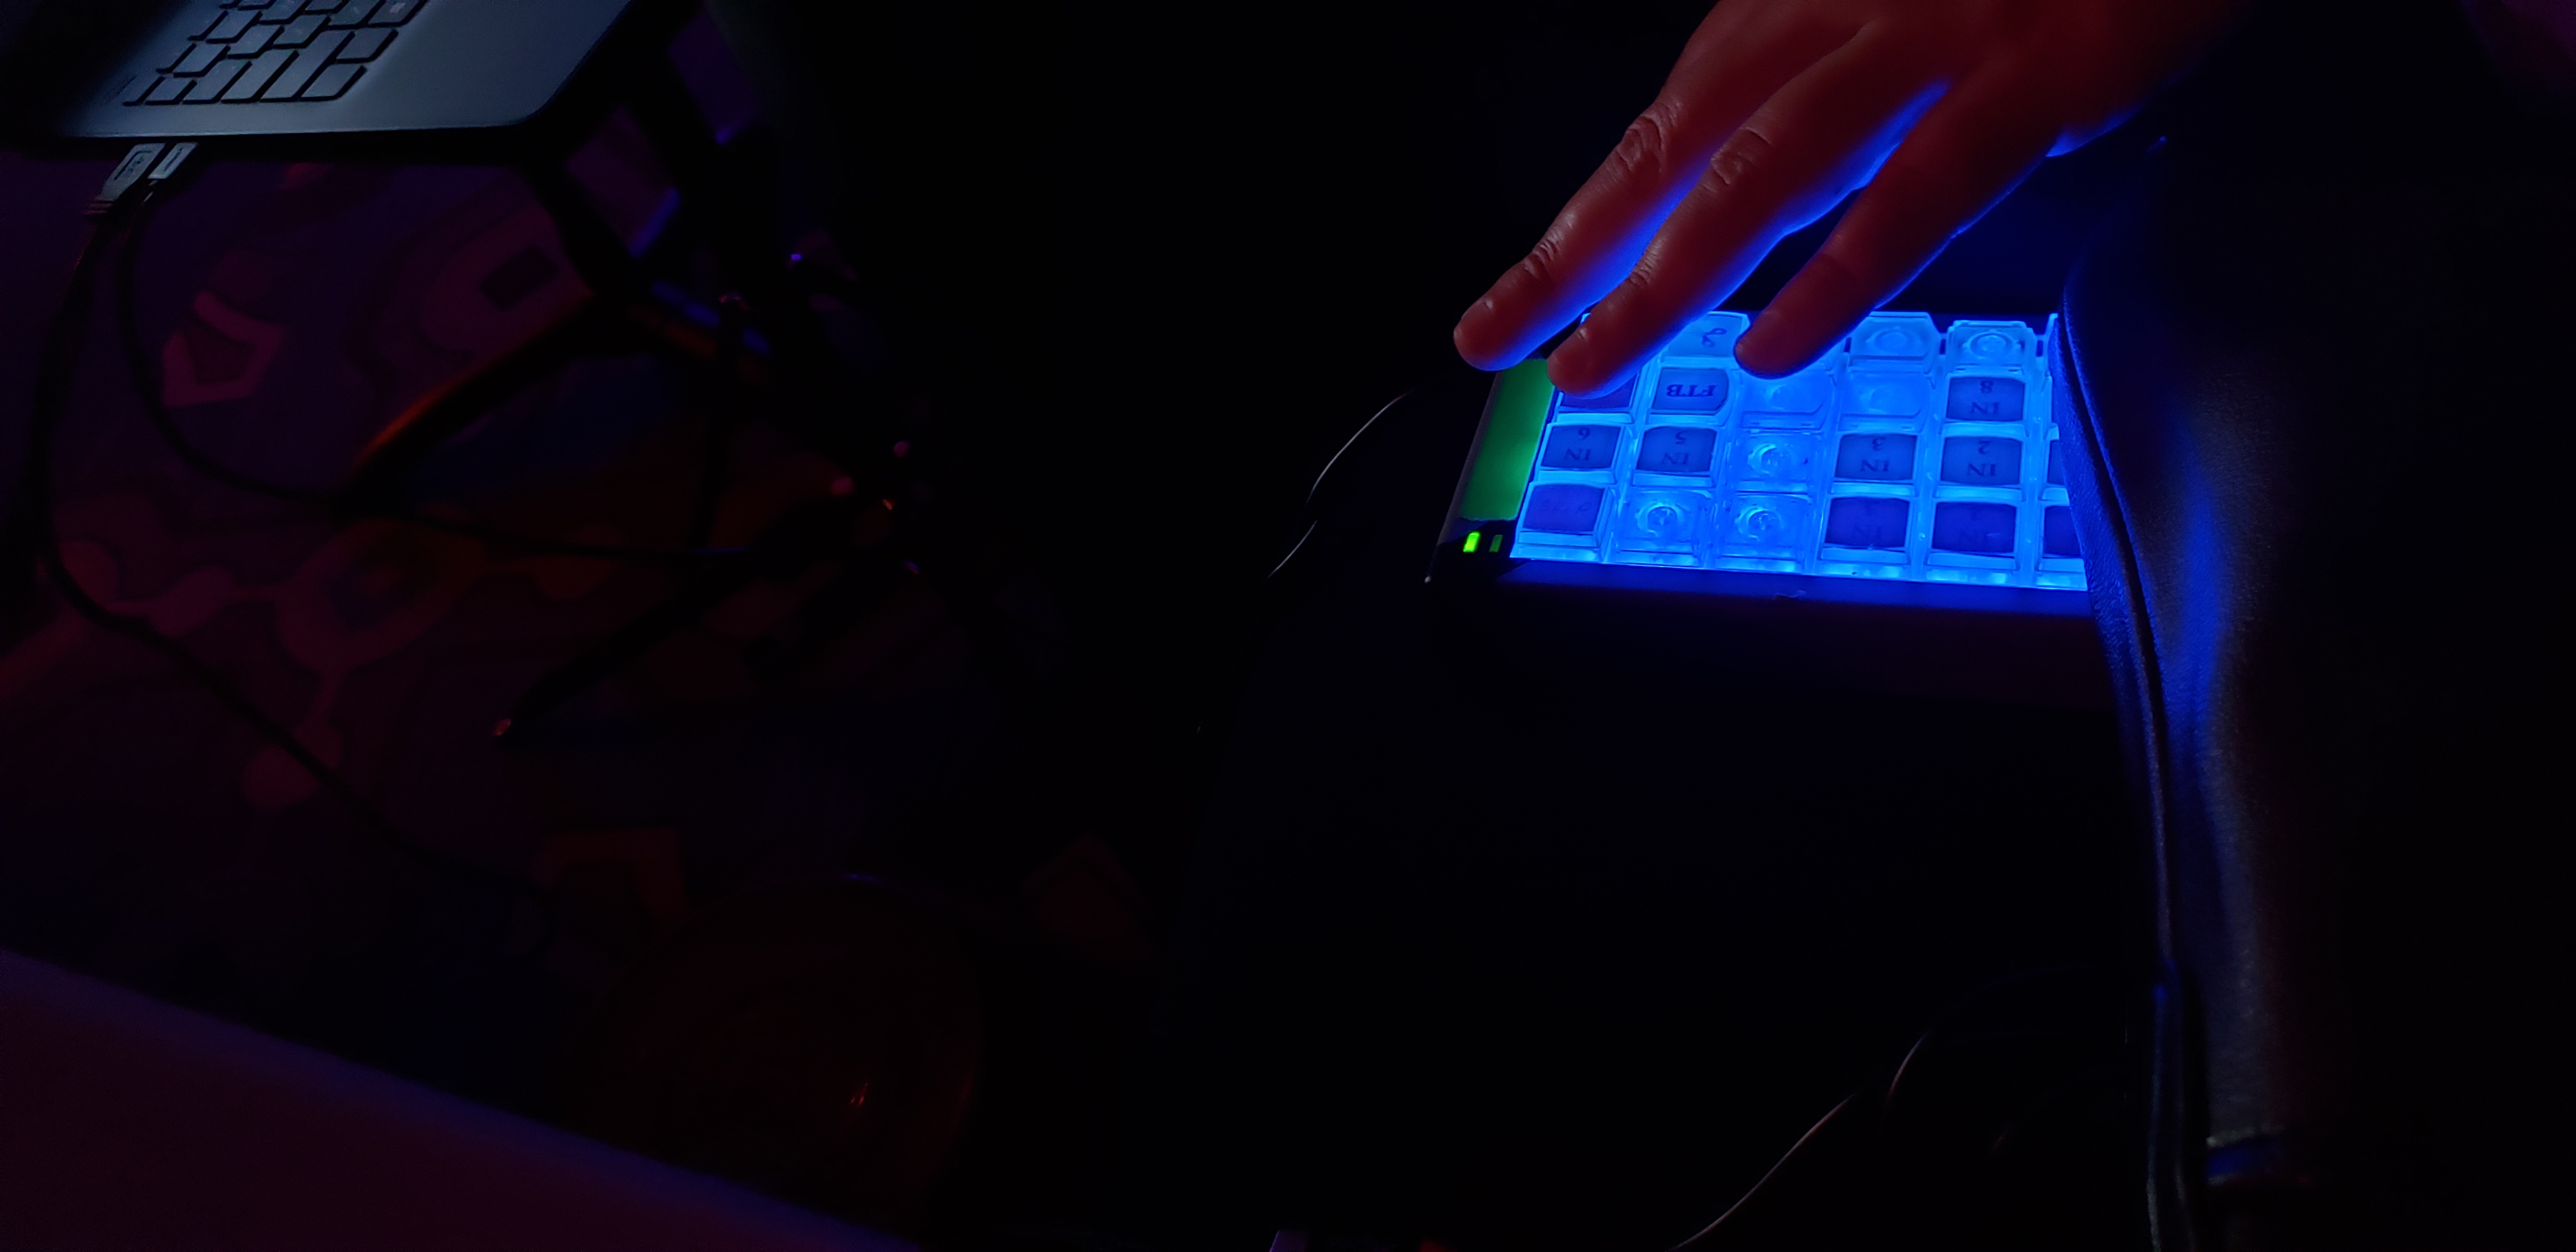
Not all captioners have/provide the same equipment but this is what our captioner had:
Stenograph machine for word-for-word Communication Access Realtime Translation (CART) transcription (same machine used by stenographers in a courtroom)
Interface to make it easier to advance lines on pre-scripted material (lyrics to music during the shows)
External monitor hard wired to her equipment so we could read the captions (yes, this show had lots of lyrics in Spanish!)
Portable tablets so could read the captions
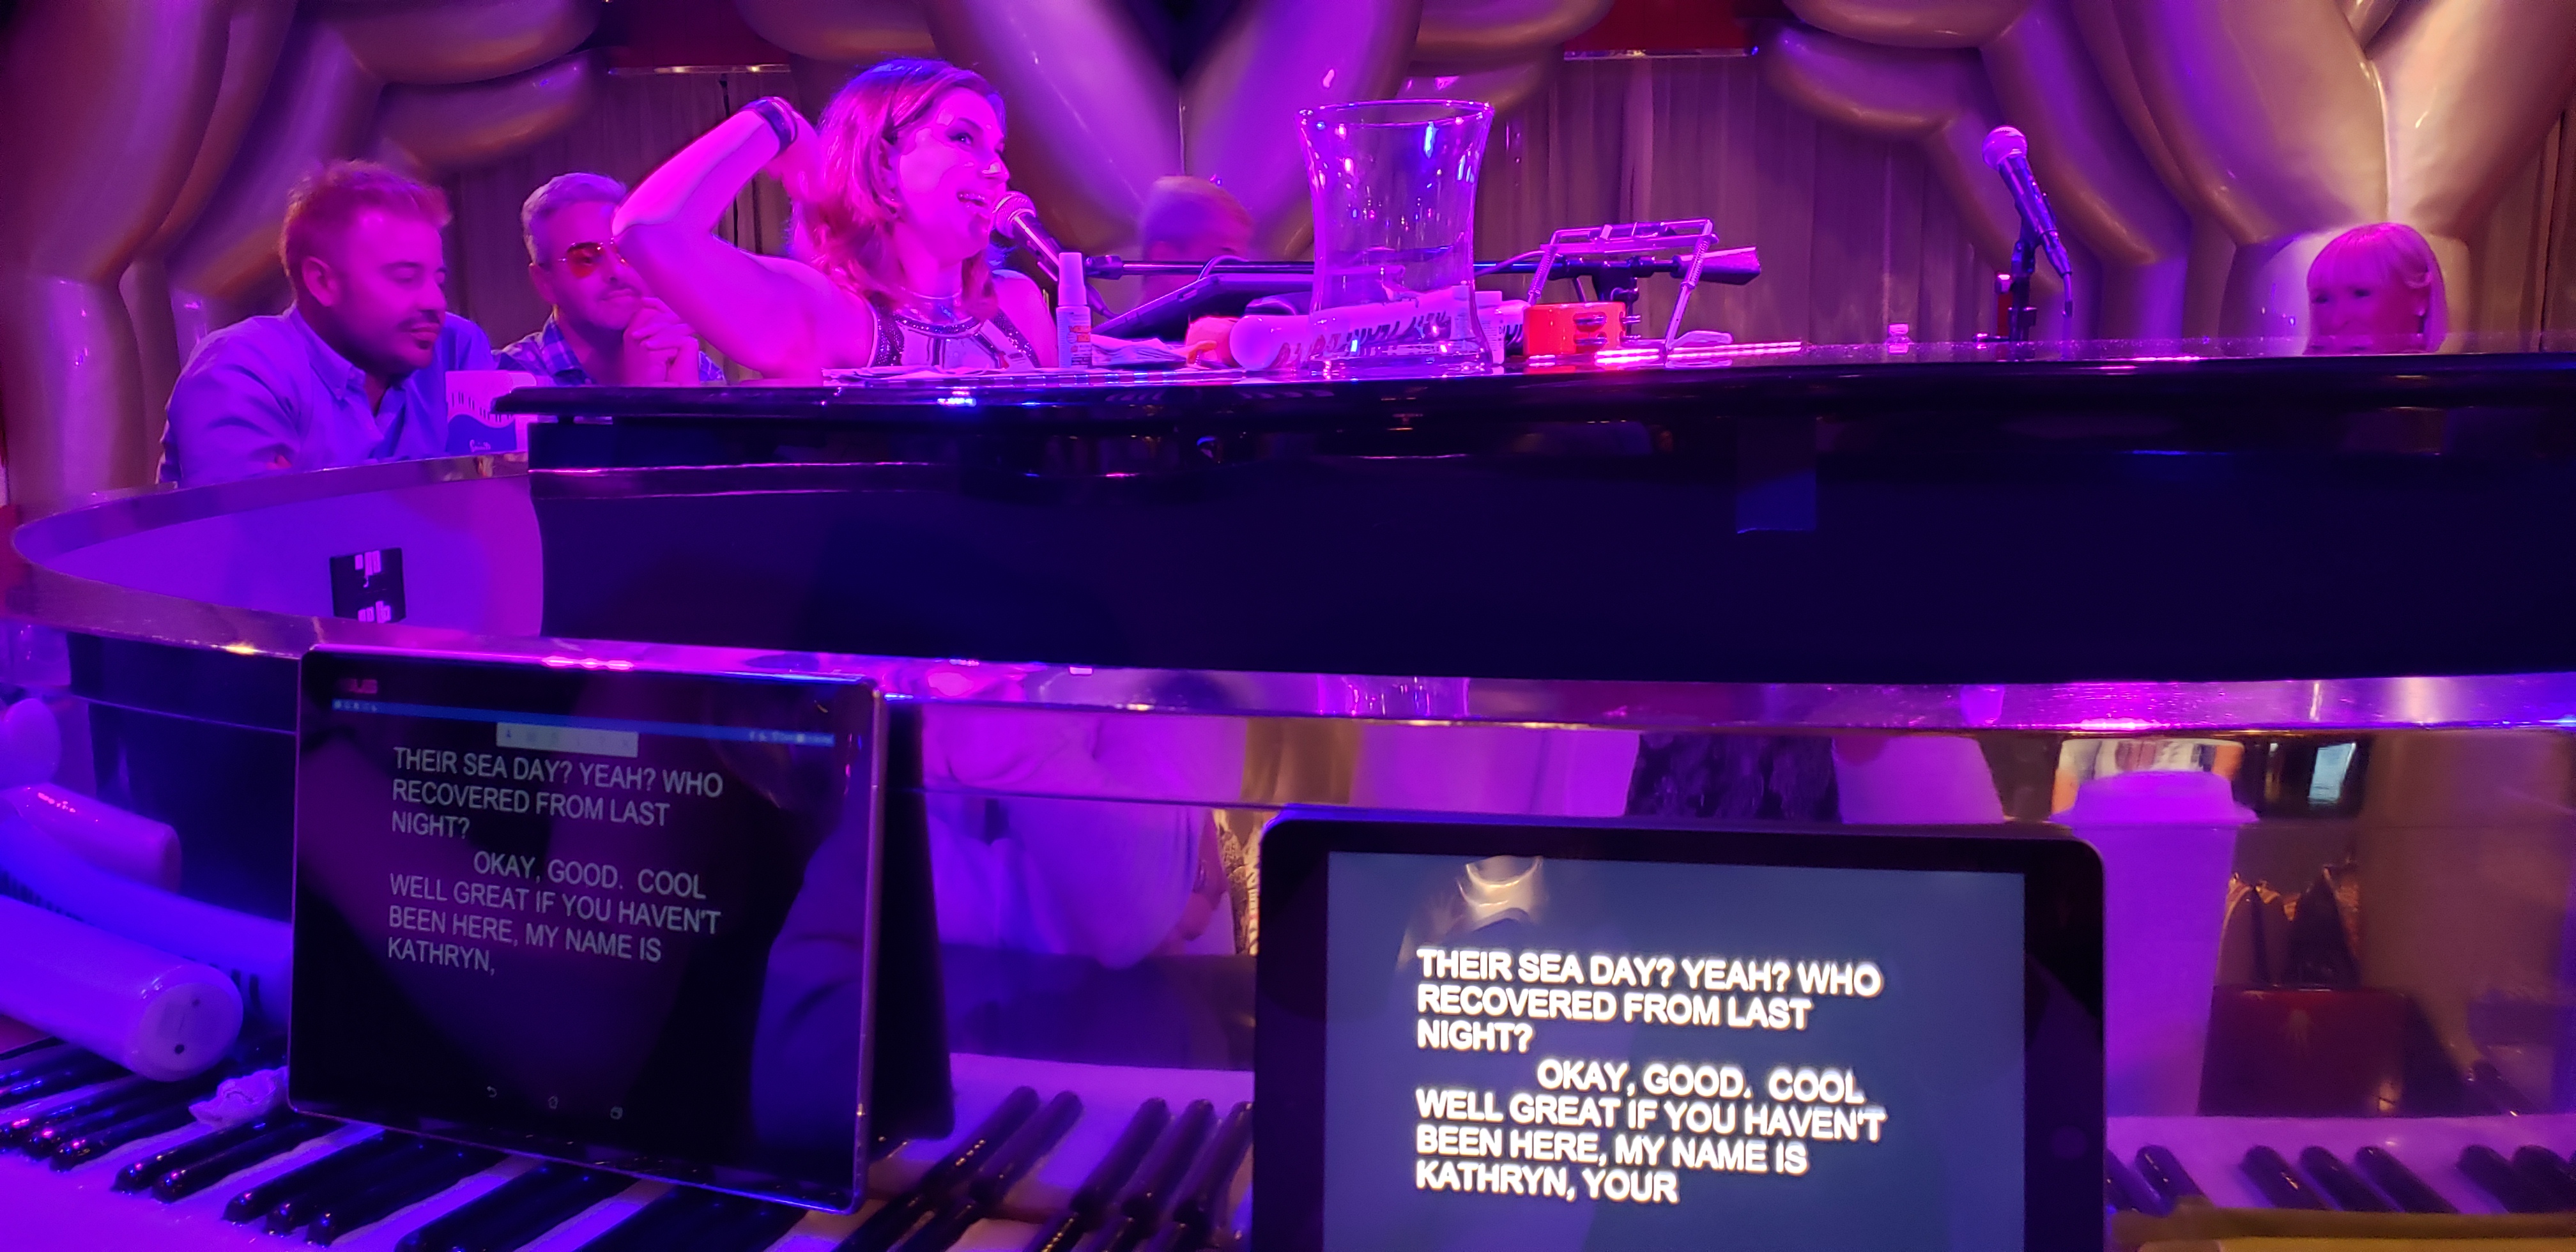
Julia in the background while Lisa and I sit at the Piano Bar
Our portable tablets at the Piano Bar
Harness for walking CART which we ended up not using (this could have been used for something like walking tours on the ship or off-boat if it was a ship-sanctioned activity)
Despite having to be a bit assertive in the initial planning stages, this whole experience was outstanding. I learned a lot and hope you learned something, too. Planning ahead is key.
(DISCLAIMER: The views below are mine and are not intended to represent how ALL people who are deaf and hard of hearing enjoy music)
An acquaintance recently asked me how I was able to enjoy myself doing things like going to all the musicals that I do, hearing my kids sing or play instruments. I told him that while I might approach how I experience music in a different way than him, it didn’t mean that I couldn’t also enjoy it.
I grew up very musical…I started piano at age 4 (and continued with lessons through high school), eventually added cello, clarinet, the bassoon (ok – only for 3 months) in elementary school and then percussion by the time I was in high school. I got to play in various bands and orchestras, sing in choirs and support musicals by playing in the pit. When it came time to apply to college, I was accepted at one school for Engineering and one for Music. I chose the former.
In college, I joined chorus where I sang alto and sometimes was piano accompaniment and even met my then-boyfriend-now-husband-who-sang-bass in that chorus. We went to concerts, saw shows and listened to bands. I ended up switching my major from Engineering to Audiology because I wanted to use my tech savviness to help deaf/hard of hearing people enjoy music. As part of my coursework in Audiology, I also was required to take a sign language class (which I eventually taught as a grad student). So many ironies, huh?
At age 29, I started losing my hearing due to Autoimmune Inner Ear Disease. Over the course of the next 9 months, I became completely deaf. I used powerful hearing aids for about a year and when those weren’t enough, I got my first cochlear implant and five years later, my second cochlear implant. My CIs have given me back so much of what I was missing including being able to hear soft sounds and understand most speech without lipreading – in ideal listening situations.
Listening in noise is difficult for people with hearing loss in general and while I often appear to be quite successful, I have to work really, really, really hard in those situations.
Another area that is challenging is enjoying music…I can hear music, I can listen to music but enjoying it is NOT automatic. (NOTE: people with normal hearing don’t always enjoy music that is presented to them either.)
What does music sound like to me?
Music is so much more than melodies, harmonies, rhythms, timbres and dynamics. Music is something to be experienced not only by the ears and the brain but also by the eyes, the heart and the soul. Enjoying music is time spent alone with your thoughts and memories or time spent together with friends and family.
My children have been involved with musical theater, choir, band and lately, we have enjoyed listening to live music at outdoor and indoor venues. With my cochlear-implant-aided hearing, do I hear everything like I used to? No. Am I still able to enjoy myself? Absolutely.
Because everyone has different levels of auditory memory and experiences, what I hear can be very different compared to what someone else hears. I was hearing for most of my life and had a very musical background. My ability to hear and process music would be very different than someone, for example, who was born deaf and received a CI as an adult (NOTE: anyone has the potential to enjoy music…we just might enjoy it in different ways).
Here’s a decent sound simulation of what it’s like for me to go hear a rock band:
In the above example, I tried to demonstrate how I can hear an awful lot but there are parts that are missing or distorted. Add lots of instruments, really loud levels that cause my CIs to go into compression (which distorts sounds even more) and it will sound even worse.
As with many people with CIs, being able to discern melodies is the most difficult. My favorite analogy to use is that while people with normal hearing might be able to hear all 88 keys on a keyboard as someone plays it wearing gloves, what I hear is more akin to someone playing all 88 keys while wearing mittens…I can definitely tell low notes vs. high notes but if the notes are close together or there is a chord, it might sound all jumbled together or one discordant pitch.
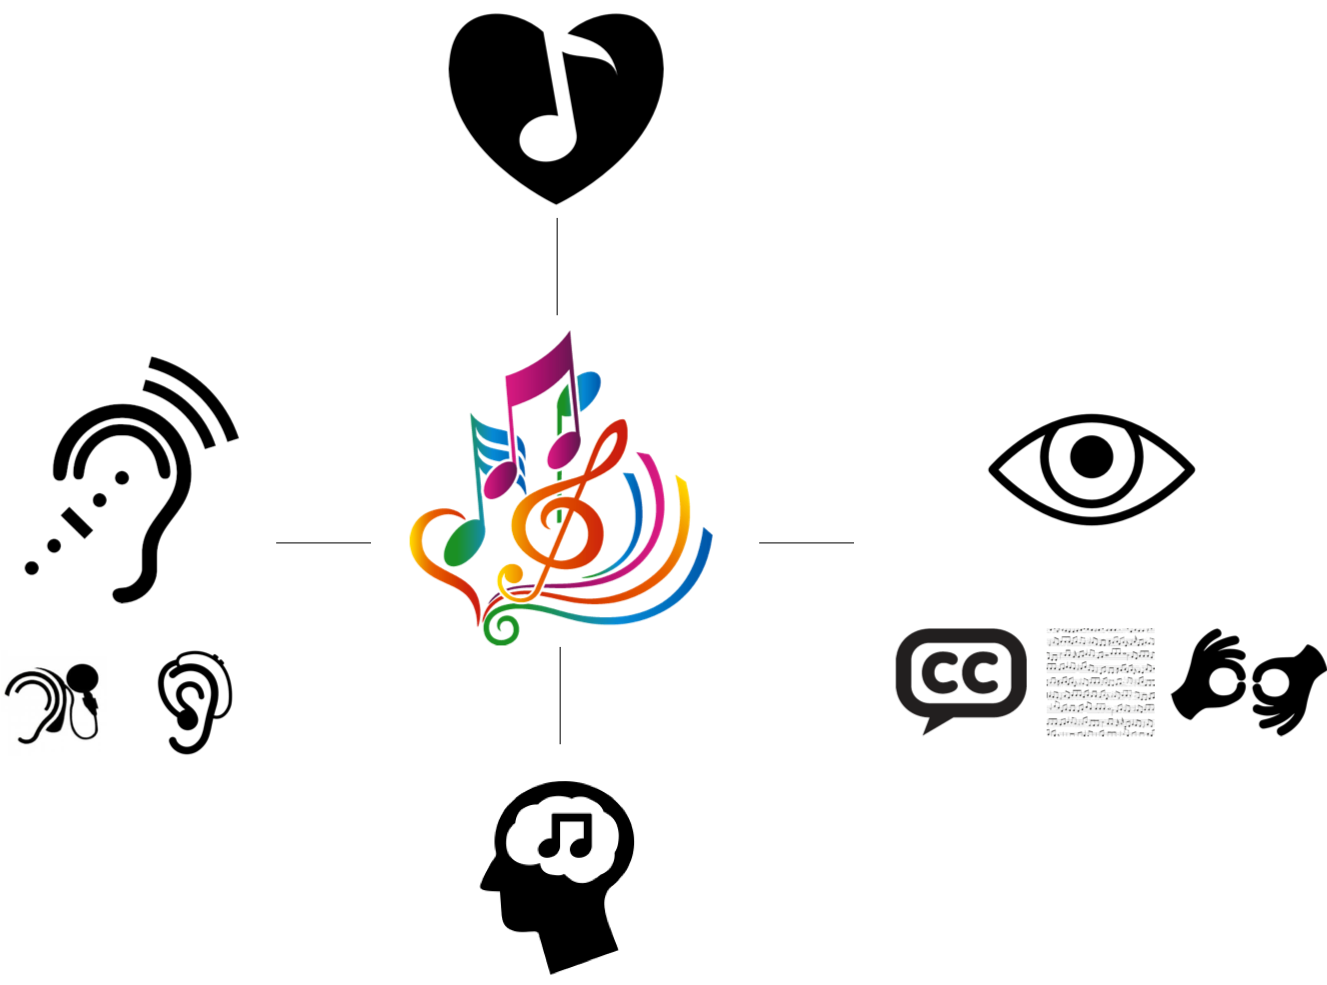
Below is a visual representation of what I feel like I hear:
What it represents is what I feel like I am experiencing as I walk into a music venue. At first, nothing makes sense and sounds like noise and I might have no idea what’s playing. As my ears and brain start to warm up and my other senses kick in, things might become more clear. Most of the time, I’m so totally almost there but not quite. Every once in a while though, my ears/brain will catch on and I will be able to identify a song or hear brilliant and clear notes and harmonies.
Tips for Multi-modal Music Enjoyment
Rather than lament the fact that I do not hear music the way I used to, I embrace practices that allow me to enjoy music the way I hear it NOW.
AUDITORY CONSIDERATIONS:
Talk to your audiologist about getting a “music program”. There are settings that can be adjusted to allow you to access more of the information you need to hear music. If there’s a piece of music that’s especially frustrating for you or you have a favorite piece of music, try bringing a recording to your appointment so you can hear how changes to your program affect how you process it.
If a venue is especially reverberant or you’re sitting in the back and the sound is distorted by the time it reaches your amplification, consider using hearing assistive technology (a/k/a assistive listening devices). Some venues have designated areas that have a hearing loop and others have personal systems. By using either of these methods, anything that has a mic (i.e., voices or instruments) will directly be transmitted to your amplification, bypassing any echo or reverberation effect.
Use other hearing assistive technology such as good quality supra-aural headphones, amplified neckloops or streamers to send music directly from your sound source to your amplification. This method can also help to block out competing background noise.
If you feel like you’re having an especially difficult time even hearing the beat, consider holding an inflated balloon in between your hands and next to your chest so you can “feel” the beat.
If you have residual hearing, you want to protect it. This gets tricky because you might need louder volumes to hear better. In certain cases though, too much volume will cause you to lose more hearing. Hearing aids and cochlear implants are set so there is a ceiling to how loud something will go but in dangerously loud environments, if you’re not using hearing protection, loudness levels can surpass these ceilings and cause more damage the louder and longer that you listen to it. If your ears are ringing or sounds are muffled after you leave a loud venue, chances are that you have affected your hearing –this can be temporary but with prolonged exposure, it can become permanent. There are also apps that can estimate how loud an environment is and even having warnings when you’re someplace that’s too loud. Go to the tab for Sound Level Meters on “Apps for Kids (and Adults) with Hearing Loss” page (http://bit.ly/Apps4HL-iOS and http://bit.ly/Apps4HL-Android) for some suggestions.
VISUAL CONSIDERATIONS:
As a musician, I benefit from being able to read sheet music to follow along. If my daughter is in a musical, I often ask to see the score so I know what it’s supposed to sound like.
If possible, try and sit close to the music source. I do better when I am able to lipread actors and singers and see their facial expressions. For live music, I can better tell where the melody is going when I can see things like their fingers moving up and down a keyboard or guitar or see how the bows of stringed instruments move up and down.
Find lyrics online so you don’t have to work so hard on understanding the words and can focus more on melodies and harmonies.
Use apps on your mobile device like SoundHound, Shazam and MusixMatch to identify artists, songs, albums and lyrics – this works best with recorded music but can sometimes work in live venues.
If watching something with a lot of dialogue or lyrics, go to or request accommodations such as open or closed captioning, or sign language interpreter(s). (ASIDE: As a signer, I appreciate going with others that sign because not only do we have ease of communication in noisy places or at a distance but we often have fun signing along with the music!)
LISTEN WITH YOUR BRAIN AND YOUR HEART:
Start with familiar music first. This is already part of your auditory memory – you don’t have to hear every note to recognize this music.
Did you know that there’s a term for why you love music from the era when you were age 12-22 (i.e., middle school, high school and college)? It’s called “neural nostalgia” and it happens because during that timeframe, your brain is already rapidly developing so what you hear and the emotions that you feel are imprinted in different parts of your cortex.
When you’re ready to listen to unfamiliar music, try music with strong vocals or primary instruments, and not too many instruments playing at the same time.
Most importantly, don’t be too hard on yourself. Just like learning a new language, hearing music in a different way takes time. With patience and practice, listening to and/or playing music can be enjoyable again.
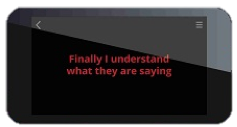
I had the privilege of being asked to participate in the Broadway League Accessibility Advisory Group. Luckily, there have been several opportunities for me to visit NYC on business so I would also take the opportunity to take in a Broadway show using the I-Caption devices and/or GalaPro app. I’ve written out some tips from my personal perspective for others who are using this technology for the first time. For more information on this initiative, go here.
Shubert Theatres should have this technology in all their theatres now with the rest of the Broadway League Theatres following suit by this summer. This technology provides an option for attending more shows, sitting where you want to and going during a time that fits your schedule. It works by automatically syncing pre-loaded captions on the device with lighting and voice recognition cues from the stage.
Please note that Theatre Development Fund (TDF) still offers the options for Open Caption and/or ASL interpreted performances. These are not going away!
It’s encouraging that there are more shows providing access but we still have a ways to go. If you have any questions or comments, be sure to provide your feedback (positive and negative) at the email cited at the end of this post.
Here’s an article by NPR showcasing the experiences of a fellow Advisory Group member.
(Me and John Waldo at “Come From Away” with our I-Caption device and GalaPro app – November 2017)
Before the show
Check with the theatre to confirm that closed captioning is available. While we are seeing more theatres with this option, not all theatres have it available yet.
Consider getting a state ID (if available in your state) so you don’t have to leave your Driver’s License.
If planning to use the GalaPro app on your personal device (mobile phone or tablet):
Download it and register before you get to the theatre
Make sure it’s fully charged and/or bring an external battery
Bring a selfie-stick large enough to hold your device in case the venue does not have a holder available (they are still working on possible solutions for this). I put the device on the selfie stick and then stand it up on my seat between my legs. You can hold with one hand or prop up with your coat or purse.
Arrive early so you can get your equipment and discuss directions on how to use it.
Ask for written directions so there are no misunderstandings and you can reference later, if needed.
Get the name of the person you talked to (e.g., take a picture of their name tag).
Make sure they know where your seat is and ask that they check on you periodically in case the equipment starts to work and then stops during the show.
I also recommend to them that they have a backup device ready to go when they check on you.
Inform the people around you that you are using an electronic device to view closed captions and not to record the show or be a distraction. Confirm with them that the position of your device is not blocking their view. Hold the device in front of your body (not to the side) so you are not blocking their view.
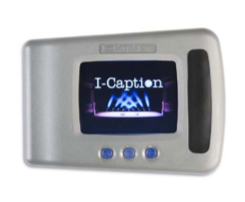
I-Caption
Consider asking for two devices so you have one for backup.
Confirm that the device is fully charged and you can see the screen ok at its brightness level.
It can fit some on some selfie sticks if you don’t want to hold it.
Ask for a GalaPro device as backup.
GalaPro
You have the choice to use your own device or one of their supplied devices – I suggest the latter so you can save your phone battery and so you don’t run into notifications coming through accidentally. If they run out of devices, then you will need to use your own device.
Using your personal device:
Make sure you specifically TURN OFF ALL NOTIFICATIONS. Even though the app requires you to go into Airplane Mode and use their special WiFi, different app notifications may still come through.
Turn your screen brightness down all the way.
If you accidentally exit the app or a notification comes through, please be considerate and shield your device (e.g., under your coat) so that it does not light up the dark theatre with your bright screen.
Follow on screen directions to connect, adjust brightness, font color and font size before the show.
Ask for an I-Caption device as backup.
After the show
Make sure YOUR Driver’s License/ID is returned.
If you ran into any problems or would like to provide feedback, get the contact information for the staff person at the Accessibility Services kiosk, House Manager and/or contact audienceservices@shubertorg.com.